
The goals
💪🏻What is "Authentication"?
✌🏻Implementing Signup & Login
👍🏻Understanding Sessions & Cookies
What is "Authentication"?
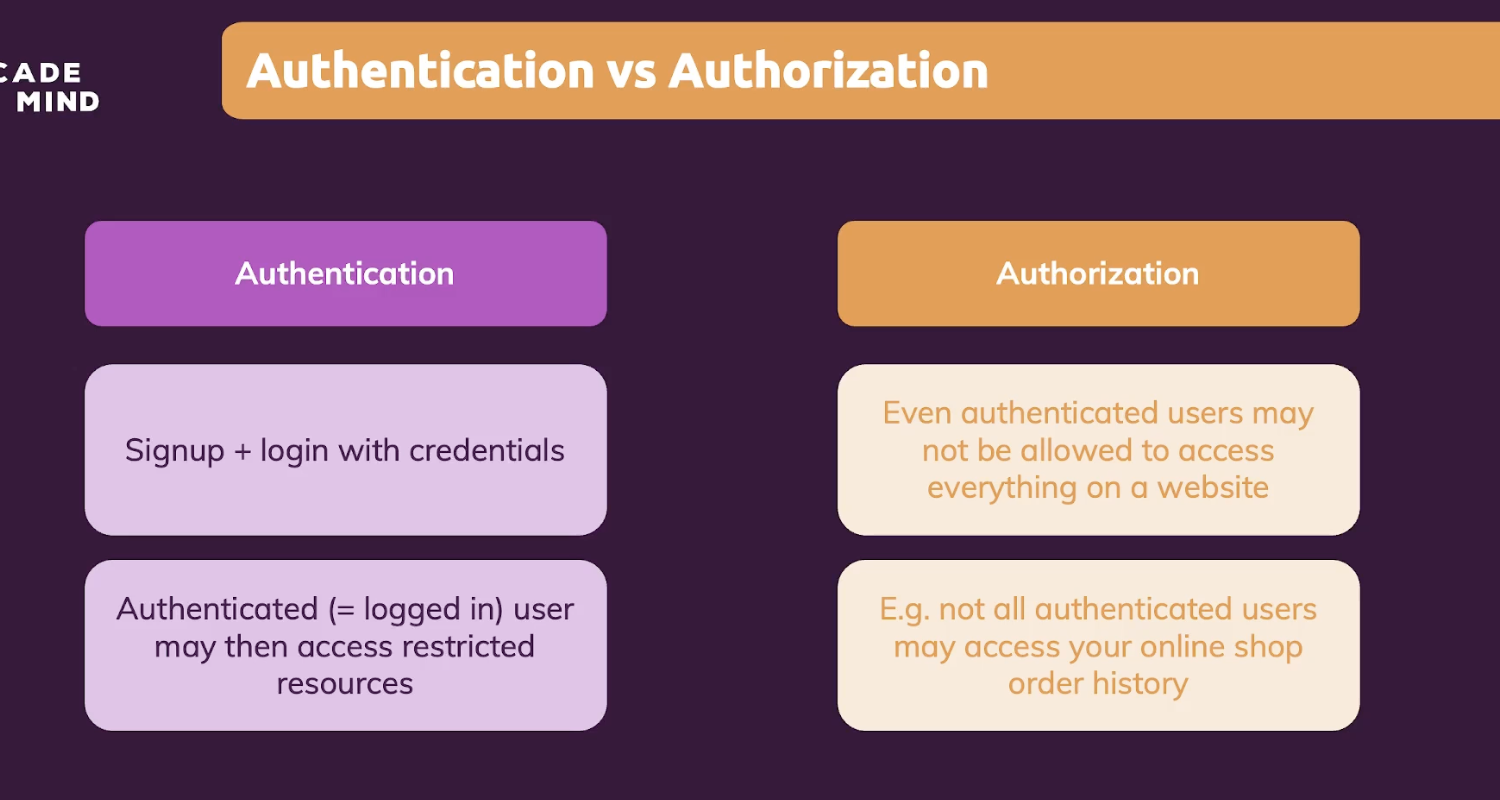
In many websites, certain "areas" (pages) should only be accessible by authenticated (=logged in) users
-Personal profile on a social network site
-Our shopping cart and order history in an online shop
-The administration area of our own blog website
User Sign Up (create account with email + password)
User Login (enter email + password)
User Authentication (grant access to protected pages)
How to check if mongodb is running?
Assuming you have MongoDB installed on your machine, you can check if it’s running by opening a terminal window and typing the following command:
ps -ef | grep -v grep | grep mongod
If MongoDB is running, you should see one or more lines of output similar to the following:
mongod –dbpath /data/db –logpath /data/log/mongod.log
If you don’t see any output, then MongoDB is not running.
To run the command, go to your Terminal and navigate to the Command Prompt. For each process that has a connection to the supplied string, grep mongod returns all processes that have a connection. Make a note of them and send it to W.C.C. for review. This will show you how many MongoDB processes are running. If it is less than 0, MongoDB will be installed on your computer. You can do it by using PS -ef. By pressing the process status command, it will be possible to see if the mongod or the mmongodb daemon is running. Because mondodb is not present, if it is not running, a 0 will be displayed. The location of the installed directory and files in the starting directory, as well as their physical locations, can be accessed via Mac’s system search.
Make sign up function
So now go to the demo.js file to fix a router for sign-up
router.post('/signup', async function (req, res) {
  const userData = req.body;
  const enteredEmail = userData.email; // userData['email']
  const enteredConfirmEmail = userData['confirm-email'];
  const enteredPassword = userData.password;

  const hashedPassword = await bcrypt.hash(enteredPassword, 12);

  const user = {
    email: enteredEmail,
    password: hashedPassword
  };

  await db.getDb().collection('users').insertOne(user);

  res.redirect('/login');
});
The one thing interesting here is that we used userData['confirm-email'] format but it's because of the dash ('-')
It's mandatory in cases where we have a prohibited character like dash(-) here
So after this code, if we sign up then we can check our data in database.
But the issue is that this password is not hashed so other people can see this data.
So we install this bcrypt.js
What is bcrypt.js?
While submitting a form, there are some sensitive data (like passwords) that must not be visible to anyone, not even to the database admin. To avoid the sensitive data being visible from anyone, Node.js uses “bcryptjs”.
This module enables storing of passwords as hashed passwords instead of plaintext.
So after using bcrypt.js, our password got encryped.
And now let's try with login
So the two steps we need to check before logging in function
1. Check the email address to see if the user exists
2. Check if the password is correct - compare typed password to encoded password
router.post('/login', async function (req, res) {
  const userData = req.body;
  const enteredEmail = userData.email;
  const enteredPassword = userData.password;

  const existingUser = await db
    .getDb()
    .collection('users')
    .findOne({ email: enteredEmail });

  if (!existingUser) {
    console.log('Could not log in!');
    return res.redirect('/login');
  }

  const passwordsAreEqual = await bcrypt.compare(
    enteredPassword,
    existingUser.password
  );

  if (!passwordsAreEqual) {
    console.log('Could not log in - passwords are not equal!');
    return res.redirect('/login');
  }

  console.log('User is authenticated!');
  res.redirect('/admin');
});
So here we wrote our code like this.
Here we used 'compare' method of bcrypt.
  const passwordsAreEqual = await bcrypt.compare(
    enteredPassword,
    existingUser.password
  );
The one thing we should know is that this admin page is unprotected so regardless of the status we can get to this page.
Check if the signup information is filled correctly
router.post('/signup', async function (req, res) {
  const userData = req.body;
  const enteredEmail = userData.email; // userData['email']
  const enteredConfirmEmail = userData['confirm-email'];
  const enteredPassword = userData.password;

  if (
    !enteredEmail ||
    !enteredConfirmEmail ||
    !enteredPassword ||
    enteredPassword.trim().length < 6 ||
    enteredEmail !== enteredConfirmEmail ||
    !enteredEmail.includes('@')
  ) {
    console.log('Incorrect data');
    return res.redirect('/signup');
  }

  const existingUser = await db
    .getDb()
    .collection('users')
    .findOne({ email: enteredEmail });

  if (existingUser) {
    console.log('User exists already');
    return res.redirect('/signup');
  }

  const hashedPassword = await bcrypt.hash(enteredPassword, 12);

  const user = {
    email: enteredEmail,
    password: hashedPassword,
  };

  await db.getDb().collection('users').insertOne(user);

  res.redirect('/login');
});
We Need To Track The User Auth Status
To block the admin.js page connection to the people who haven't logged in, we need to track the user auth status.
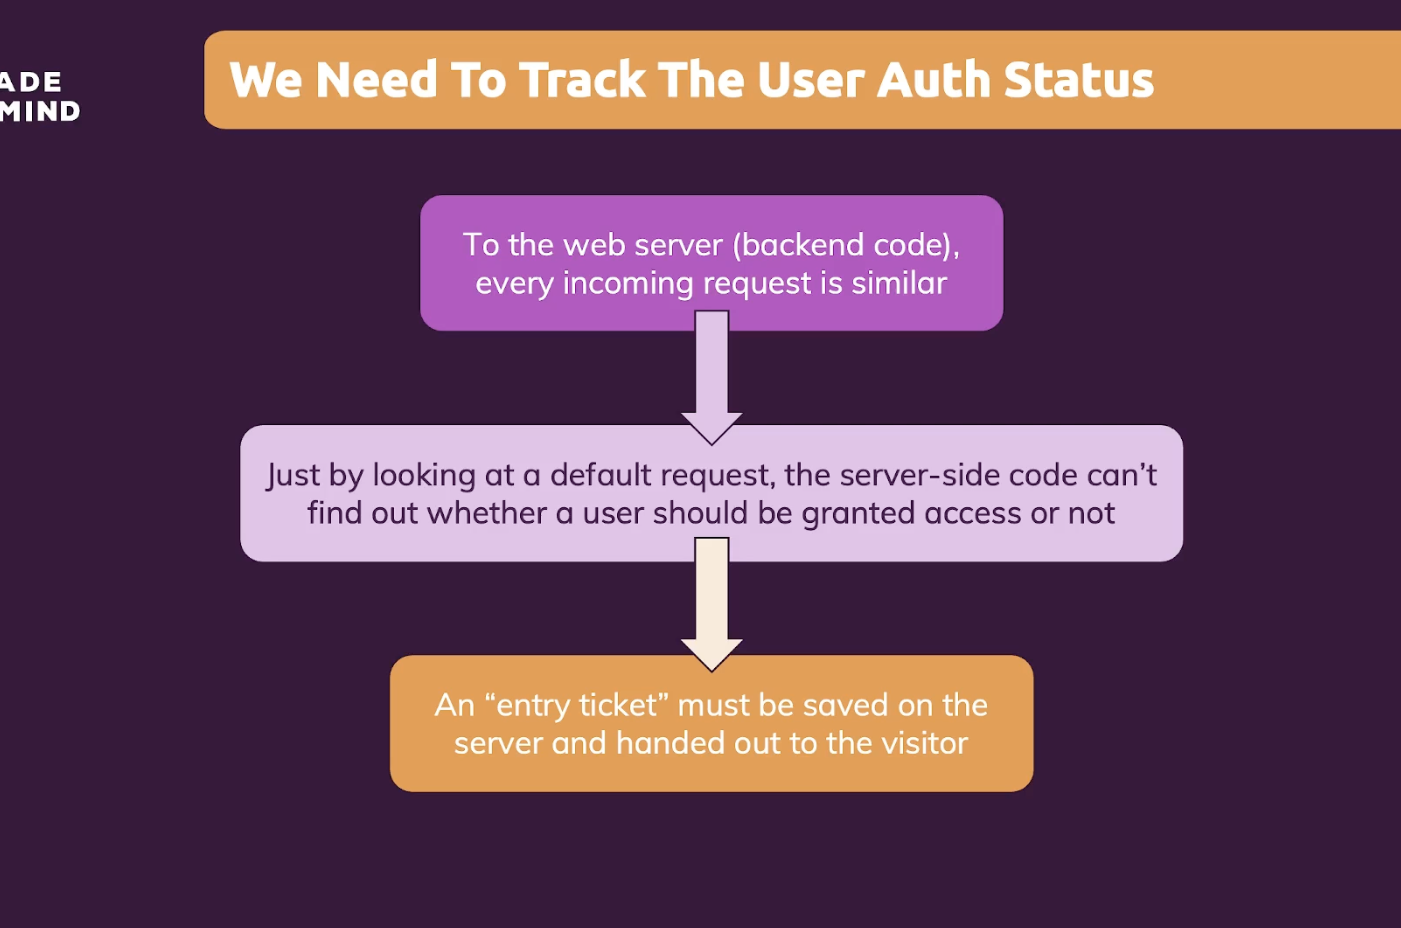
You can think of a "cookie" as a form of automatically-managed data storage in the browser. We'll take a closer look at cookies later in this section.
What is express-session?
Why do we need session?
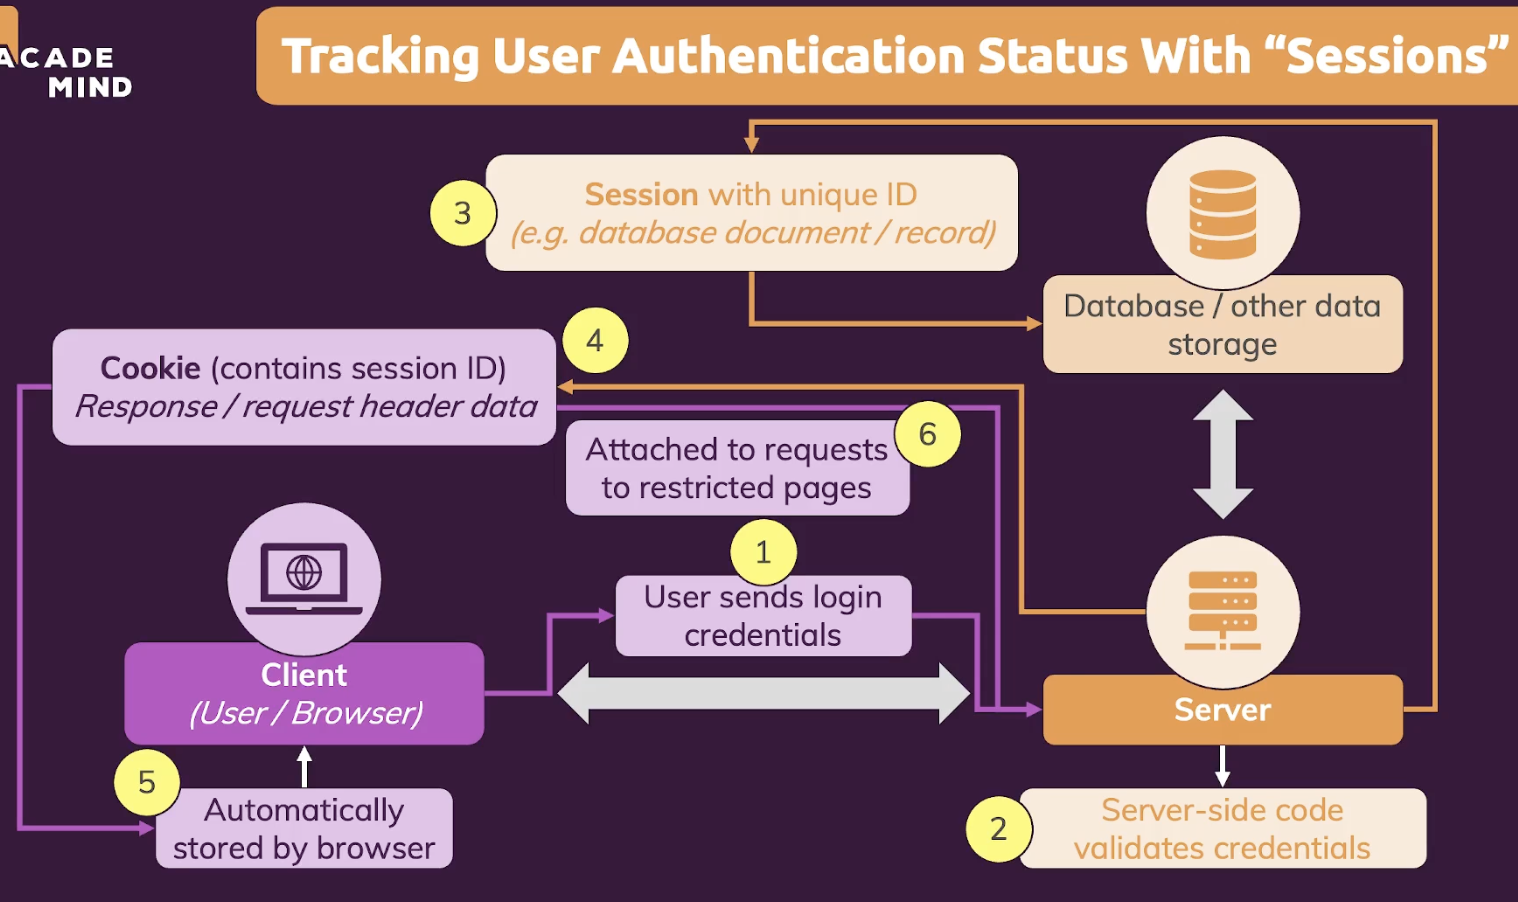
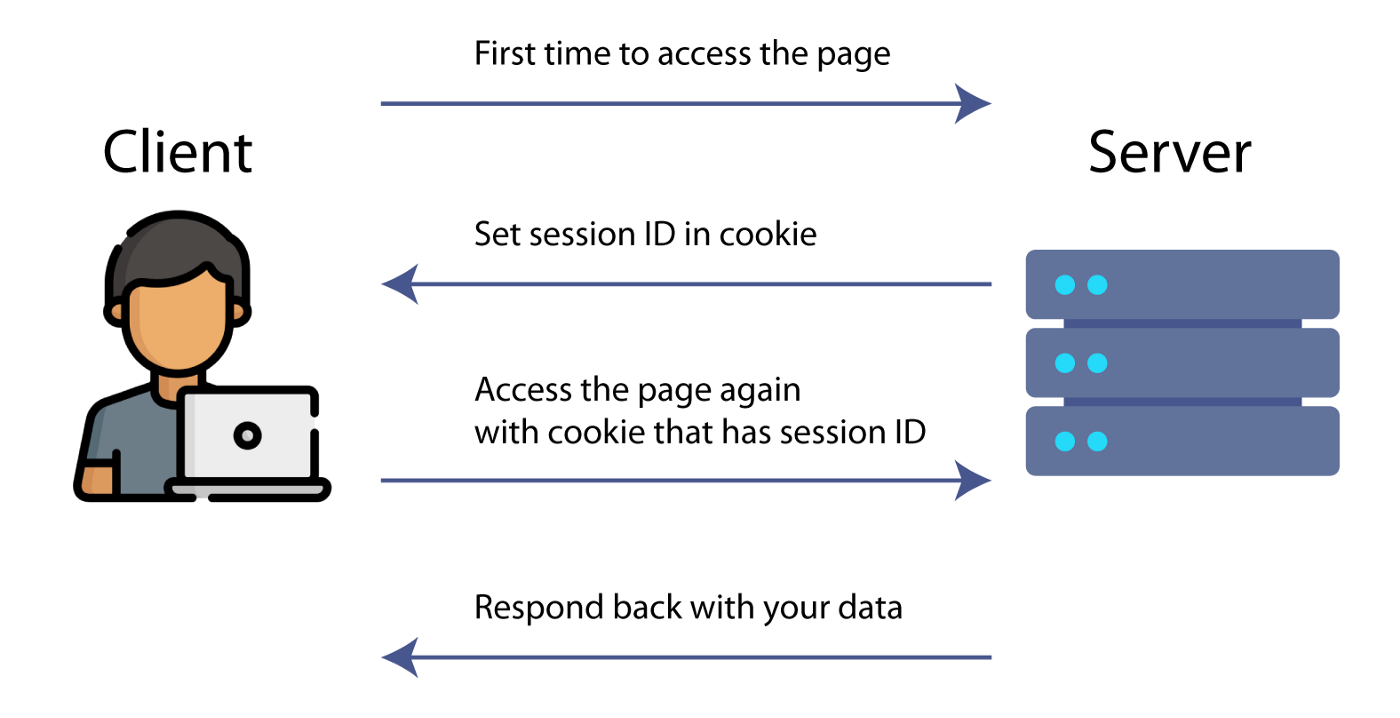
Before we start, we have to ask why do we need session. The reason is that HTTP protocol is stateless, which means it cannot keep track of user. To solve this problem, the server can create a session for tracking the user, including the data in the requests and responses between the client and server.
How session is created?
Session is created in server when the client send a request to it for the first time. There are different ways to create a session, depends on the language you use. This article focuses on express-session .
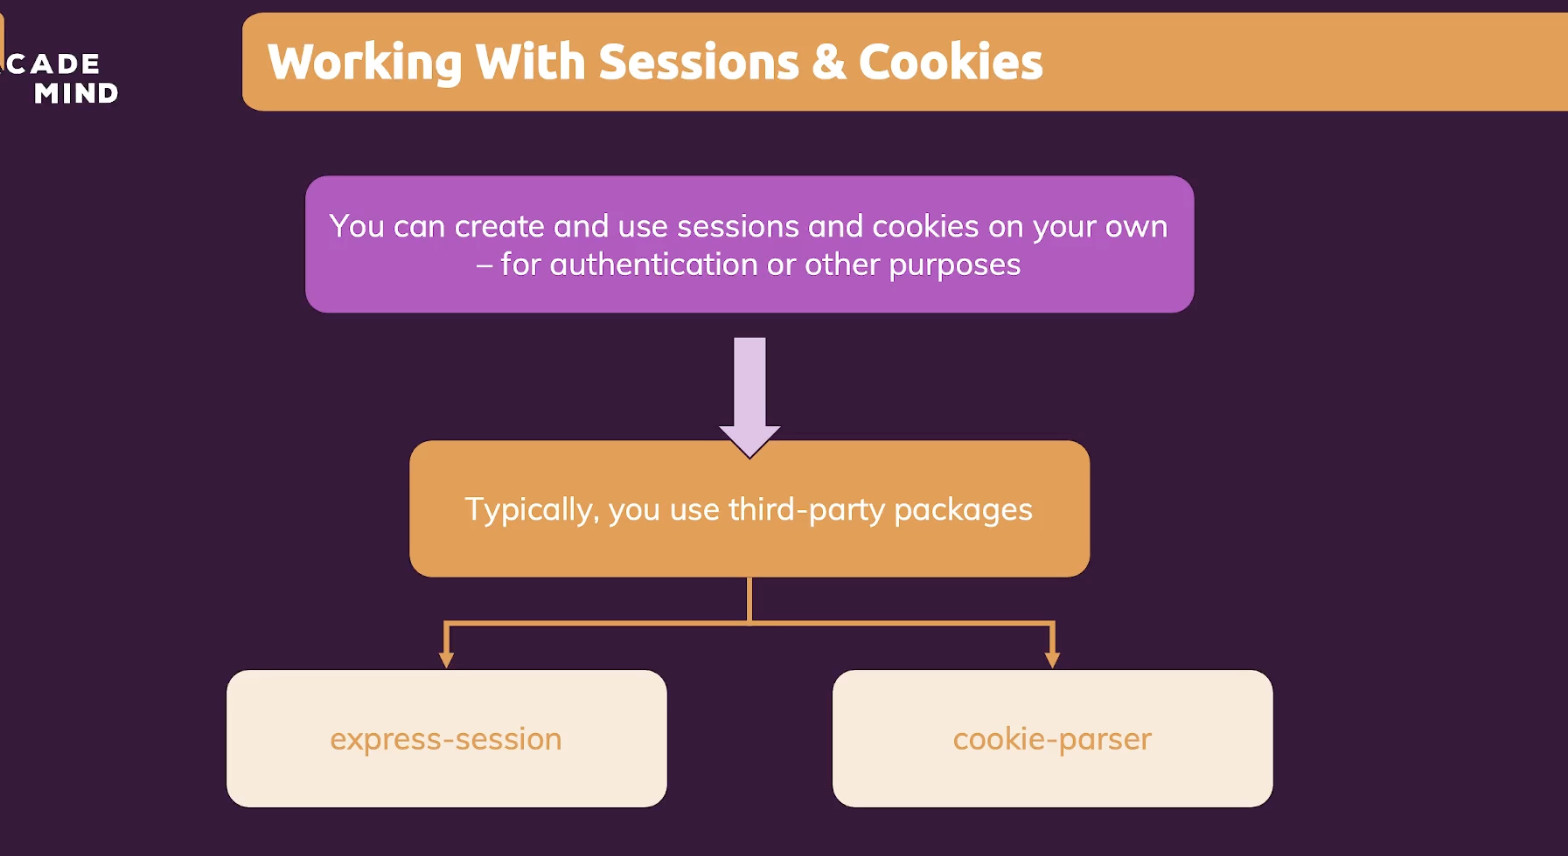
For express-session , we create a session in a middleware.
var app = express()
var session = require('express-session')

app.use(session({
  secret: 'keyboardcat',
  resave: false,
  saveUninitialized: true,
  cookie: { secure: true }
}))

// Access the session as req.session
app.get('/', function(req, res, next) {
	console.log(req.session)
  res.send('Hello World!')
})
To make sure we can the incoming request has a session, we should put the session middleware before all of the routes. The middleware will:
- Check if this request has cookie with valid session ID
- If yes, search for the matching session ID in session store and retrieve the data
- If no, create a new session and add it to the request object. Also create a session ID cookie based on the cookie options you set in the middleware
More details about this process is mentioned in this stackoverflow discussion.
Session options
There are options for manipulating the session. Details of each common options such as httpOnly , secret, secure can be found on the official documentation.
Take resave option as an example,express-session will store the session automatically if the session has been altered, because we set resave: false in the session middleware.
Session.save(callback)
…This method is automatically called at the end of the HTTP response if the session data has been altered (though this behavior can be altered with various options in the middleware constructor). Because of this, typically this method does not need to be called.
If the session is not altered, the session ID will not be set in the cookie.
Session ID
Besides the session object, a session ID is necessary for searching a particular session that stored in the session store. The process works like:
client → GET request (with session ID in cookie) → server → search for this user’s session with his session ID
When a client visits the website for the first time, he does not have a session ID in his cookie. Thus, after he sends his first GET request to the server, the server has to set a session ID in his cookie.
session()
Setup session store with the given options.
Session data is not saved in the cookie itself, however
cookies are used, so we must use the cookieParser()
middleware before session().
Examples:
connect()
  .use(connect.cookieParser())
  .use(connect.session({ secret: 'keyboard cat', key: 'sid', cookie: { secure: true }}))
Options:
- key cookie name defaulting to connect.sid
- store session store instance
- secret session cookie is signed with this secret to prevent tampering
- cookie session cookie settings, defaulting to { path: '/', httpOnly: true, maxAge: null }
- proxy trust the reverse proxy when setting secure cookies (via "x-forwarded-proto")
Cookie option:
By default cookie.maxAge is null, meaning no "expires" parameter is set
so the cookie becomes a browser-session cookie. When the user closes the
browser the cookie (and session) will be removed.
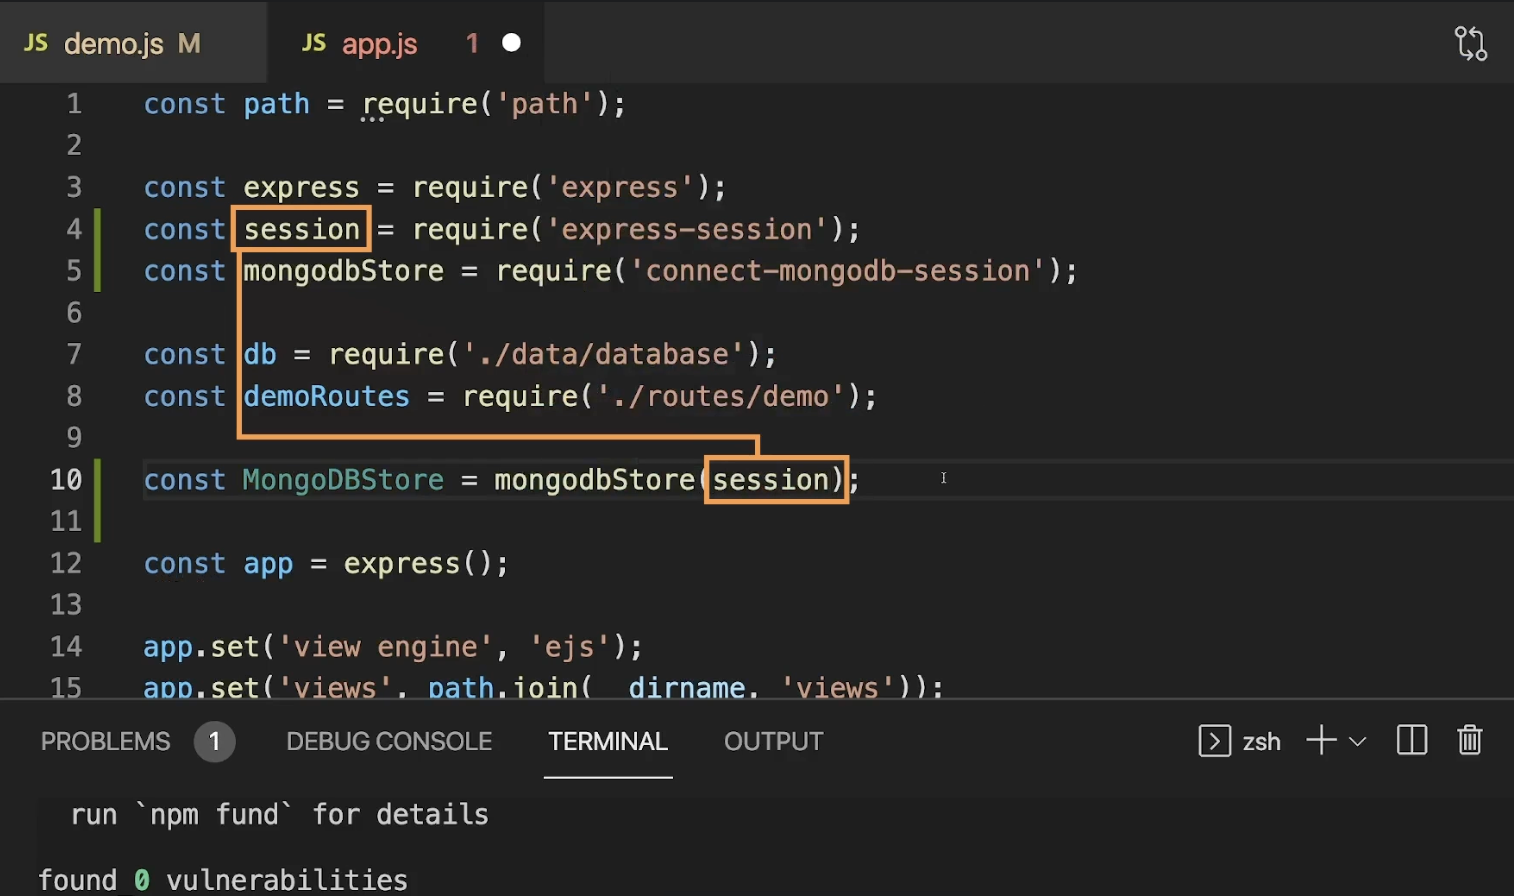
We just made session now and we can use this!
And when we make session store in app.js the uri should be the same with client address in database.js
Now to clarify that we have some rights to access 'admin' page after logging in, we can write some code before redirecting to admin page.
router.post('/login', async function (req, res) {
const userData = req.body;
const enteredEmail = userData.email;
const enteredPassword = userData.password;
const existingUser = await db
.getDb()
.collection('users')
.findOne({ email: enteredEmail });
if (!existingUser) {
console.log('Could not log in!');
return res.redirect('/login');
}
const passwordsAreEqual = await bcrypt.compare(
enteredPassword,
existingUser.password
);
if (!passwordsAreEqual) {
console.log('Could not log in - passwords are not equal!');
return res.redirect('/login');
}
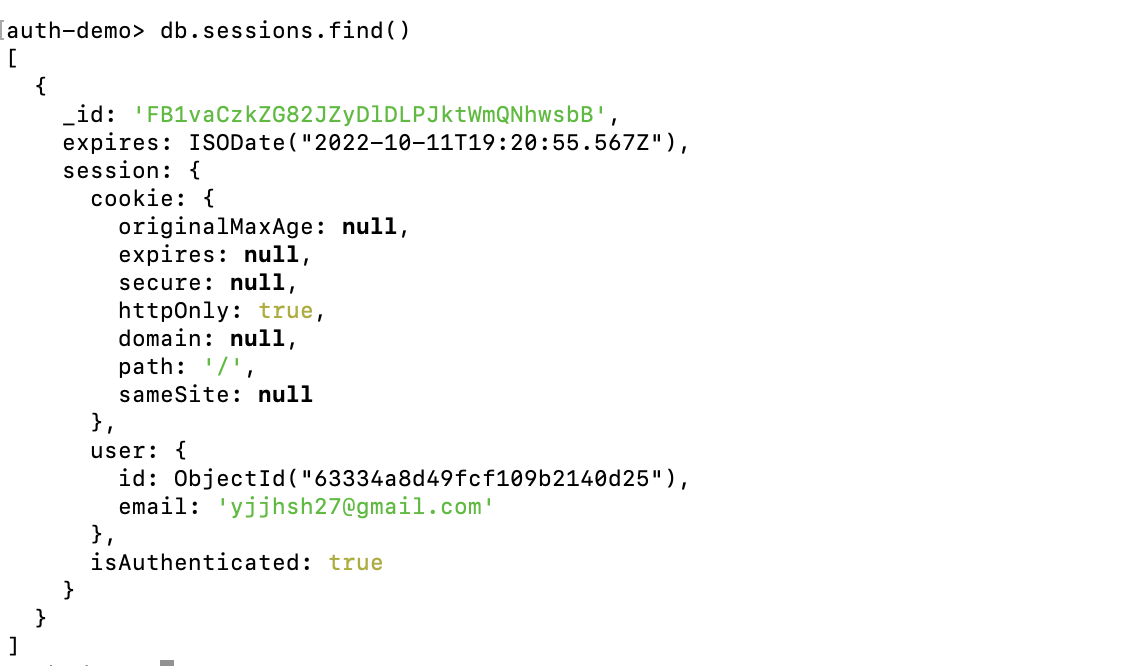
req.session.user = { id: existingUser._id, email: existingUser.email };
req.session.isAuthenticated = true;
req.session.save(function () {
res.redirect('/admin');
});
});Here we used "session" property of request.
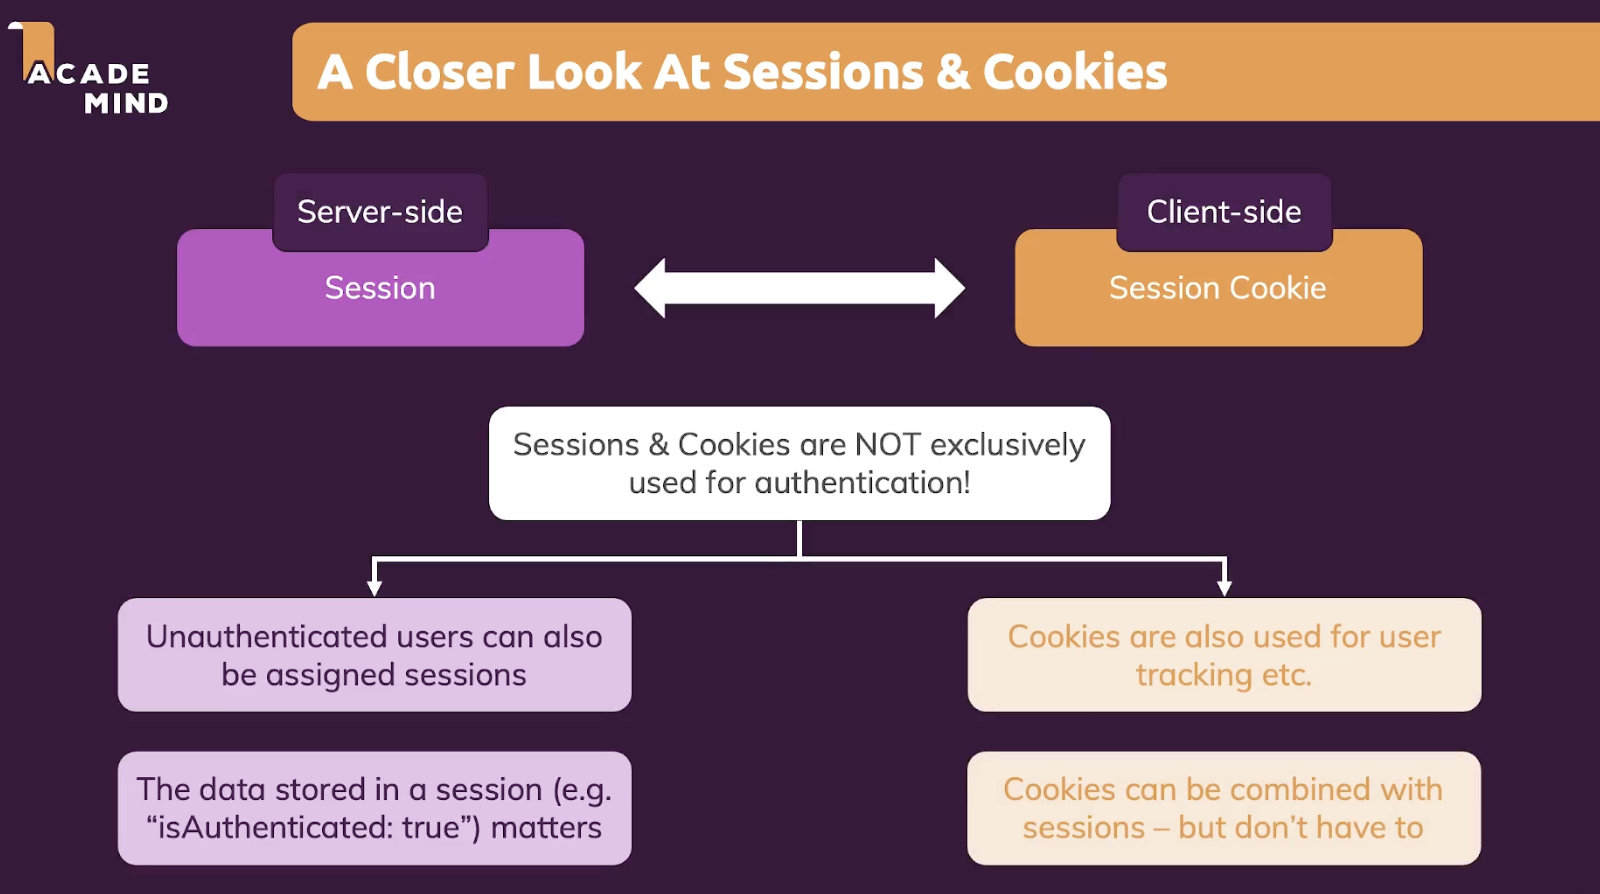
This "session" property / object is provided by the express-session package which manages the sessions for us. Every request (no matter if from a logged-in user or not) has a session!
So after checking the user info, updating the session info and save it as user information in session. And use save property of session to save it in database.
In the end, when we save the user data to database, we can move to the function to redirect this page.
If a visitor doesn't have an active session yet (because no data was stored for them), all session properties will simply be "undefined"-which is a falsy value!
Use the “req.isAuthenticated()” function to protect logged in routes
Passport JS conveniently provides a “req.isAuthenticated()” function, that
- returns “true” in case an authenticated user is present in “req.session.passport.user”, or
- returns “false” in case no authenticated user is present in “req.session.passport.user”.
The “req.isAuthenticated()” function can be used to protect routes that can be accessed only after a user is logged in eg. dashboard.
// Create a function as follows,
checkAuthenticated = (req, res, next) => {
  if (req.isAuthenticated()) { return next() }
  res.redirect("/login")
}
// Now you can use this function as middleware to protect your routes as follows
app.get("/dashboard", checkAuthenticated, (req, res) => {
  res.render("dashboard.ejs", {name: req.user.name})
})
Similarly, if the user is already logged in and attempt to access the “register” or “login” screen, you can direct them to the (protected) “dashboard” screen.
// Create a function as follows,
checkLoggedIn = (req, res, next) => {
  if (req.isAuthenticated()) {
       return res.redirect("/dashboard")
   }
  next()
}
// Now you can use this function as middleware to as follows,

app.get("/login", checkLoggedIn, (req, res) => {
     res.render("login.ejs")
})
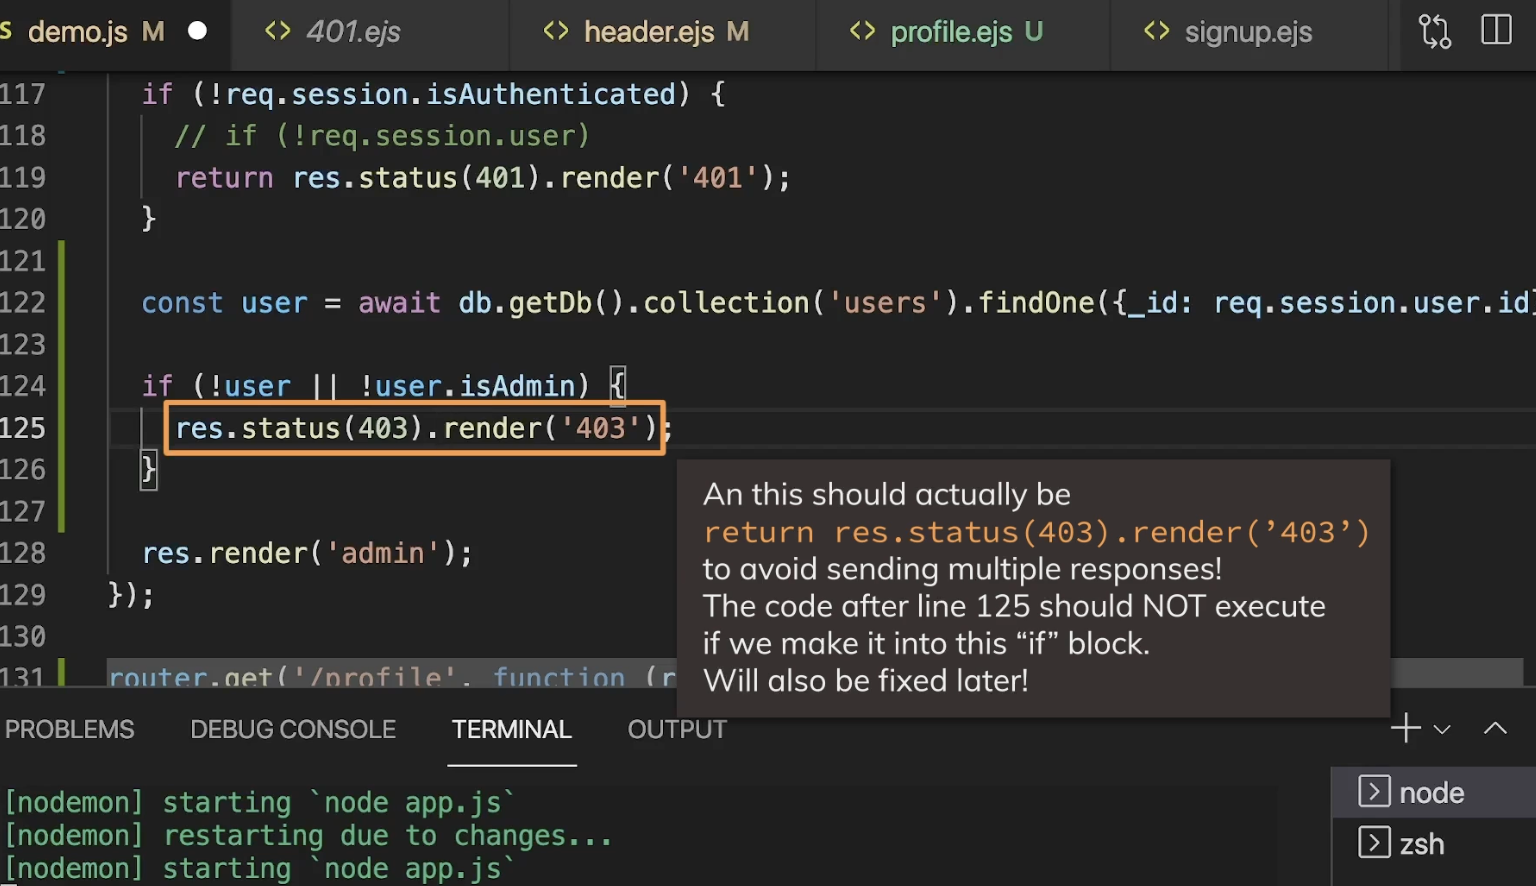
When the access has been denied we can use '401' status code.
How to expire session after 1 min of inactivity in express-session of Express.js ?
// Call Express Api.
var express = require('express'),
	// Call express Session Api.
	session = require('express-session'),
	app = express();
// Session Setup
app.use(
	session({
		// It holds the secret key for session
		secret: "I am girl",
		// Forces the session to be saved
		// back to the session store
		resave: true,
		// Forces a session that is "uninitialized"
		// to be saved to the store
		saveUninitialized: false,
		cookie: {
			// Session expires after 1 min of inactivity.
			expires: 60000
		}
	})
);
// Get function in which send session as routes.
app.get('/session', function (req, res, next) {
	if (req.session.views) {
		// Increment the number of views.
		req.session.views++
		// Session will expires after 1 min
		// of in activity
		res.write(
'
<p> Session expires after 1 min of in activity: '
+ (req.session.cookie.expires) + '</p>
')
		res.end()
	} else {
		req.session.views = 1
		res.end(' New session is started')
	}
})
// The server object listens on port 3000.
app.listen(3000, function () {
	console.log("Express Started on Port 3000");
});
If you set "cookies.maxAge" on the session middleware, browser will NOT delete the session cookies = this only applies if no maxAge was set (i.e. in the default case)!
Incognito tab is recognised as a new user.
Add logout function
router.post('/logout', function (req, res) {
  req.session.user = null;
  req.session.isAuthenticated = false;
  res.redirect('/');
});
It was like this.
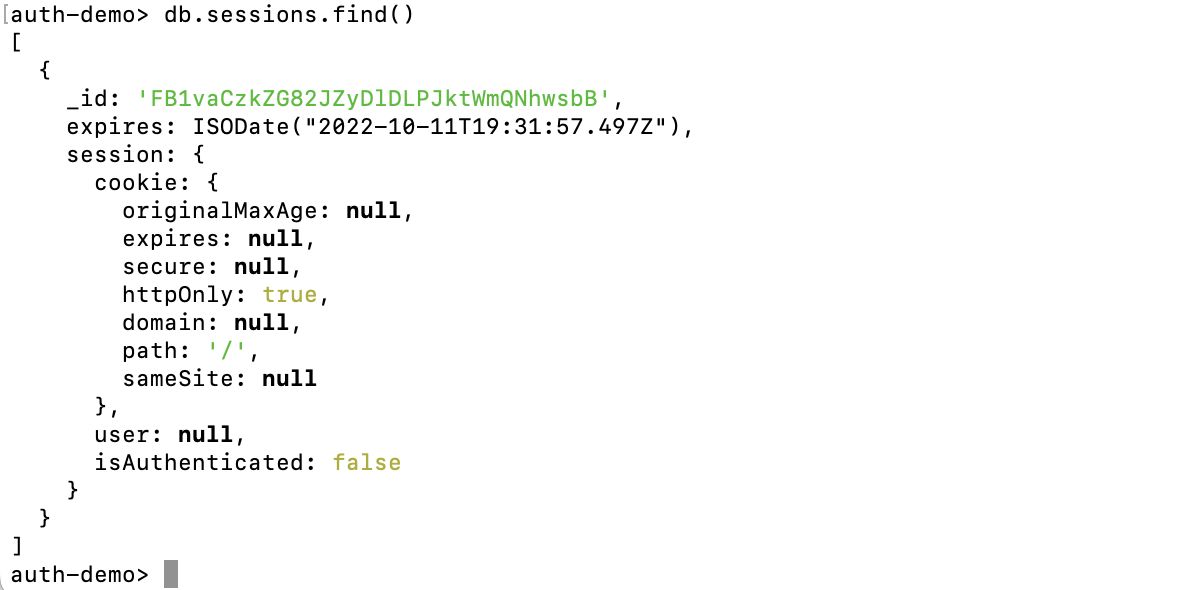
After logging out our user status has been changed!
session flashing
Authentication vs Authorization
Anyway at last, we need send user's information to each page header and it can be pretty annoying forwarding this to every template.
So we can write some code to make our own middleware to send data automatically every templates.
Also, the order of middleware functions are matters! We access req.session in this middleware, hence it has to be added AFTER the middleware where the session package is intialized for the incoming request!
next parameter works as a function
next simply tells express that request for this middleware which is being executed here should be forwared to the next middleware or route in line
res.locals
However, when using a view engine with Express, you can set intermediate data on res.locals in your middleware, and that data will be available in your view (see this post). It is common practice to set intermediate data inside of middleware on req.locals to avoid overwriting view data in res.locals, though this is not officially documented.
res.locals An object that contains response local variables scoped to the request, and therefore available only to the view(s) rendered during that request / response cycle (if any). Otherwise, this property is identical to app.locals.
This property is useful for exposing request-level information such as the request path name, authenticated user, user settings, and so on.
The res.locals property is an object that contains response local variables scoped to the request and because of this, it is only available to the view(s) rendered during that request/response cycle (if any).
So this locals allows us to set some global values, any values of our choice
   <ul>
      <li><a href="/">Home</a></li>
      <% if (!locals.isAuth) { %>
        <li><a href="/signup">Signup</a></li>
        <li><a href="/login">Login</a></li>
      <% } %>
      <% if (locals.isAdmin) { %>
        <li><a href="/admin">Admin</a></li>
      <% } %>
      <% if (locals.isAuth) { %>
        <li><a href="/profile">Profile</a></li>
        <li>
          <form action="/logout" method="POST">
            <button>Logout</button>
          </form>
        </li>
      <% } %>
   </ul>
If we set like this in header, then we will show some of menus when we have some status.
so when we are administrator or when we are logged in or out, we can see some menus.
It makes our code really simple!
We don't have to write many codes to validate user in each route! just use this res.locals!
Sources
https://www.npmjs.com/package/bcryptjs
bcryptjs
Optimized bcrypt in plain JavaScript with zero dependencies. Compatible to 'bcrypt'.. Latest version: 2.4.3, last published: 6 years ago. Start using bcryptjs in your project by running `npm i bcryptjs`. There are 2791 other projects in the npm registry us
www.npmjs.com
https://www.geeksforgeeks.org/password-encryption-in-node-js-using-bcryptjs-module/
Password encryption in Node.js using bcryptjs module - GeeksforGeeks
A Computer Science portal for geeks. It contains well written, well thought and well explained computer science and programming articles, quizzes and practice/competitive programming/company interview Questions.
www.geeksforgeeks.org
https://www.npmjs.com/package/express-session
express-session
Simple session middleware for Express. Latest version: 1.17.3, last published: 5 months ago. Start using express-session in your project by running `npm i express-session`. There are 4388 other projects in the npm registry using express-session.
www.npmjs.com
https://expressjs.com/en/resources/middleware/session.html
Express session middleware
express-session Installation This is a Node.js module available through the npm registry. Installation is done using the npm install command: $ npm install express-session API var session = require('express-session') session(options) Create a session middl
expressjs.com
https://medium.com/@prashantramnyc/node-js-with-passport-authentication-simplified-76ca65ee91e5
Node JS with Passport Authentication simplified
Quickly and easily integrate Passport Authentication into your Node JS application — a clear and simple explanation of Passport JS!
medium.com
https://expressjs.com/en/api.html#res.locals
Express 4.x - API Reference
Express 4.x API express() Creates an Express application. The express() function is a top-level function exported by the express module. var express = require('express') var app = express() Methods express.json([options]) This middleware is available in Ex
expressjs.com