
[Project 2] Timetable - recoil, react-hook-form, material-ui, local storage

Organize the directory first.
To make a table we make cell and row jsx files.
We will put the selection of time near the timetable so for that, we will make an array of times.
Use Material-ui to make a table format.
import React from "react";
import {
  TableContainer,
  Typography,
  Table,
  TableHead,
  TableBody,
  TableRow,
  TableCell,
} from "@mui/material";

const hourData = Array.from({ length: 11 }, (i, j) => j + 9);

// {
//   mon:[{}]
//   tue:[{}]
// }

export default function Timetable() {
  return (
    <>
      <TableContainer>
        <Typography>
          <div>Timetable</div>
        </Typography>
        <Table>
          <TableHead>
            <TableRow>
              <TableCell align="center" width={100}>
                Time
              </TableCell>
              <TableCell align="center" width={200}>
                Mon
              </TableCell>
              <TableCell align="center" width={200}>
                Tue
              </TableCell>
              <TableCell align="center" width={200}>
                Wed
              </TableCell>
              <TableCell align="center" width={200}>
                Thu
              </TableCell>
              <TableCell align="center" width={200}>
                Fri
              </TableCell>
            </TableRow>
          </TableHead>
          <TableBody>
            {hourData.map((time, index) => {
              return (
                <TableRow key={index}>
                  <TableCell align="center">{`${time}:00 - ${
                    time + 1
                  }:00`}</TableCell>
                </TableRow>
              );
            })}
          </TableBody>
        </Table>
      </TableContainer>
    </>
  );
}
{
mon:[{
start: 9,
end: 11,
name: "Math",
color: "#adasdd",
id:""
}],
tue:[{}]
}Just temporarily set data and use Recoil to update data as we set on the table.
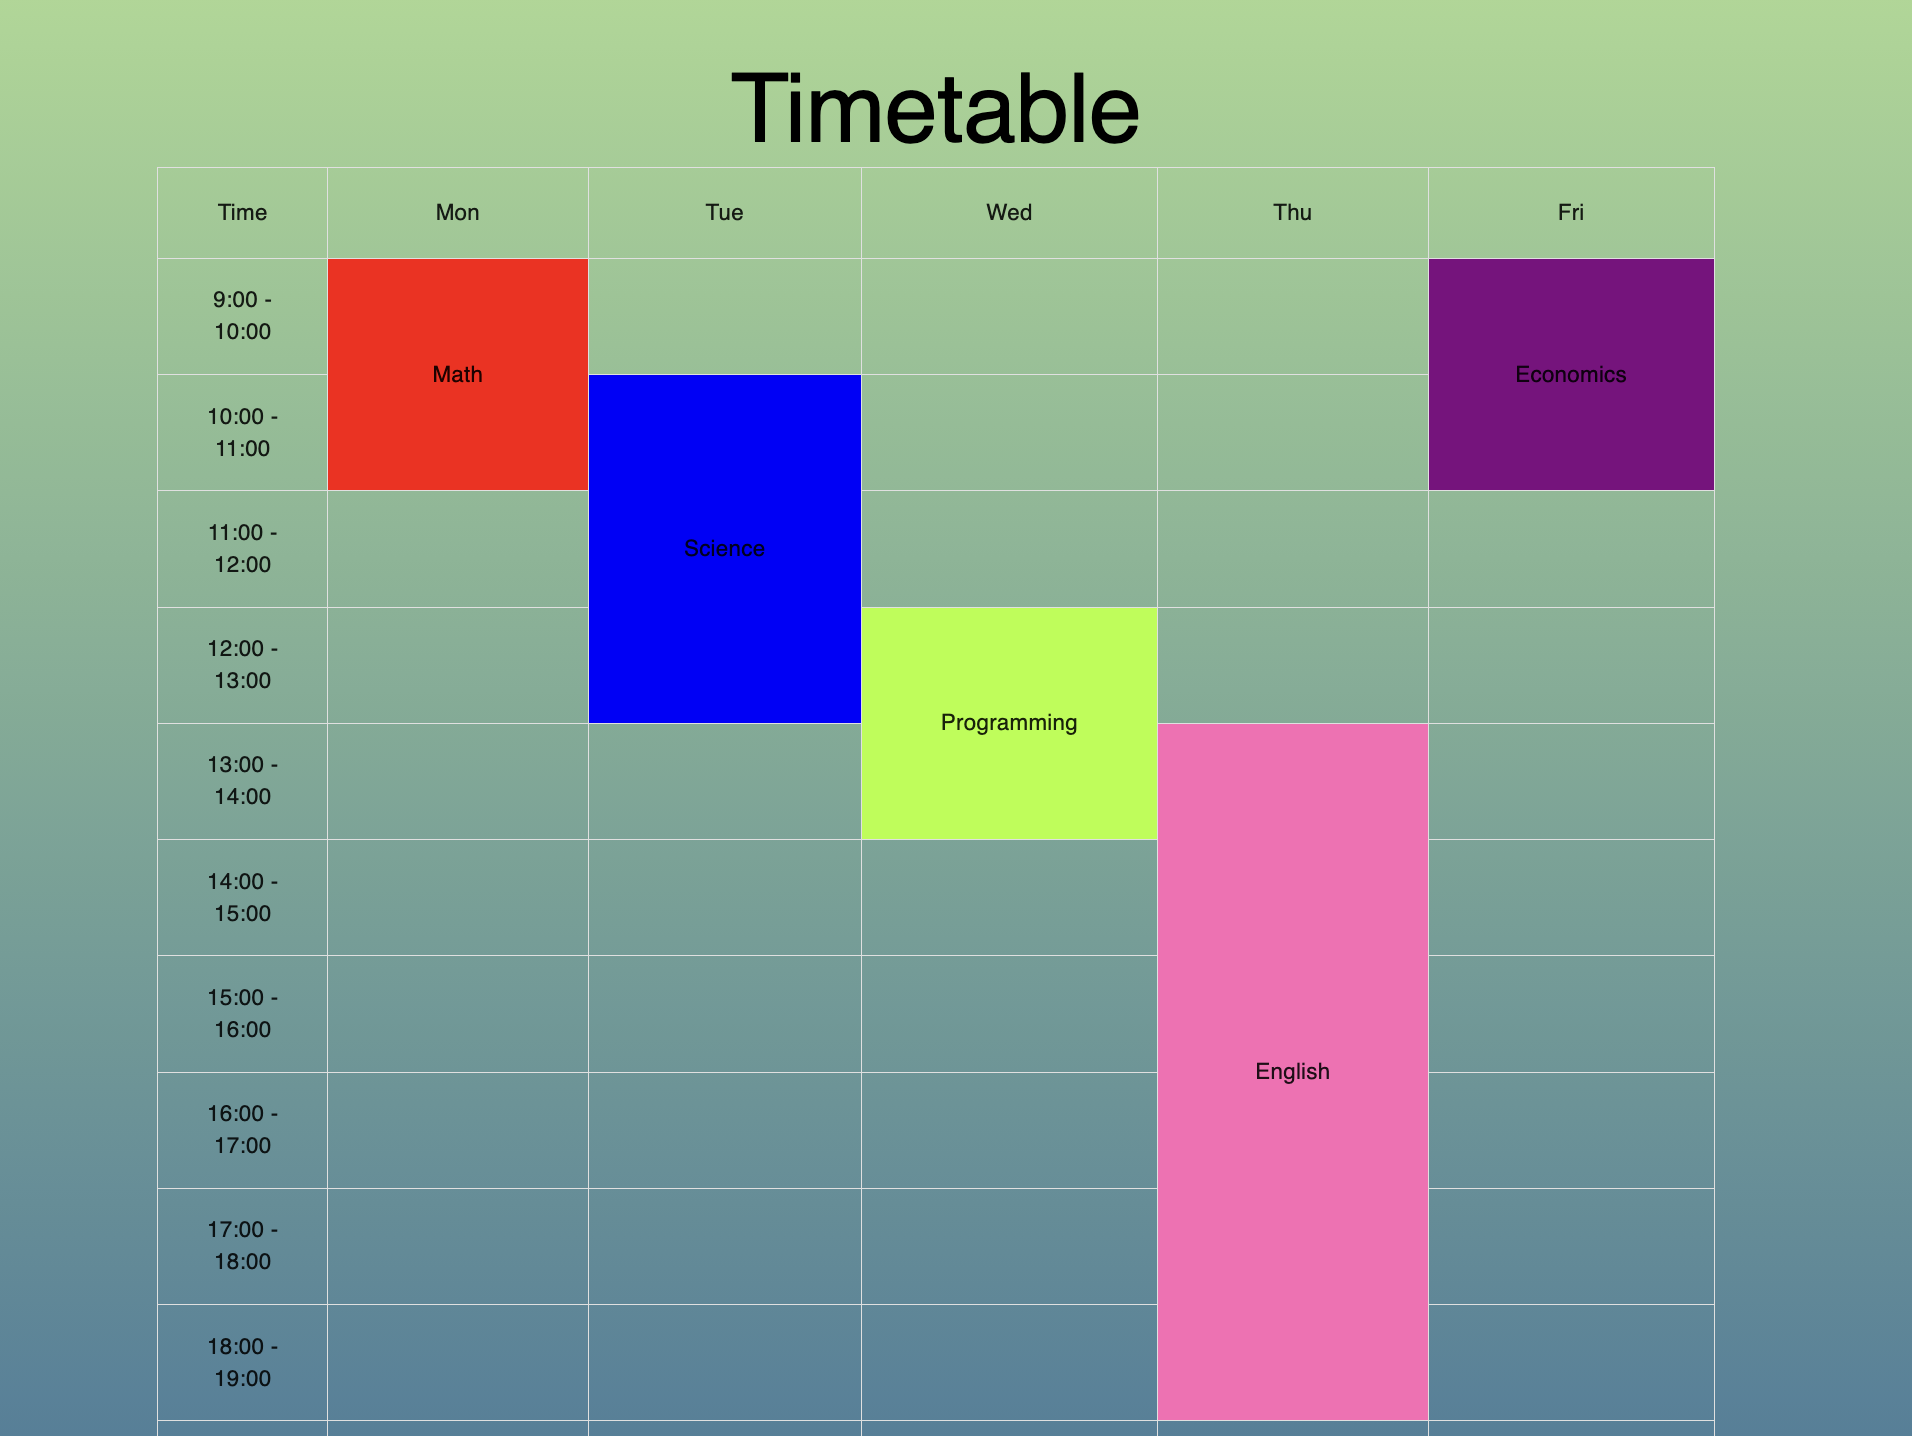
import { atom } from "recoil";

export const timeTableState = atom({
  key: "timeTableState",
  default: {
    mon: [{ start: 9, end: 11, name: "Math", color: "red", id: 1 }],
    tue: [{ start: 10, end: 13, name: "Science", color: "blue", id: 2 }],
    wed: [
      { start: 12, end: 14, name: "Programming", color: "greenyellow", id: 3 },
    ],
    thu: [{ start: 13, end: 19, name: "English", color: "hotpink", id: 4 }],
    fri: [{ start: 9, end: 11, name: "Economics", color: "purple", id: 5 }],
  },
});
Save timetable data in state.
import { TableCell } from "@mui/material";
import React from "react";
import { useRecoilState } from "recoil";
import { timeTableState } from "../store/store";

export default function TimeTableCell({ day, timeNum }) {
  const [timeTableData, settimeTableData] = useRecoilState(timeTableState);
  const timeData = timeTableData[day].find((time) => time.start <= timeNum)
  return <TableCell />;
}
It's like using 'useState'
To block the occurrence of calculation every time when it renders, we can use 'useMemo'
?. or ??. => Optional chaining operator based on ES11
to check if the property's value is none or something other.
If it's undefined it will say it's undefined not just showing error.
Material-ui styles
const styles = () => ({
  Table: {
    "& th,td": {
      border: "1px solid rgba(224, 224, 224 , 1)",
    },
  },
});
<Table className={classes.Table}>export default withStyles(styles)(TimeTable);
We will be improving by adding data and replacing mock data.
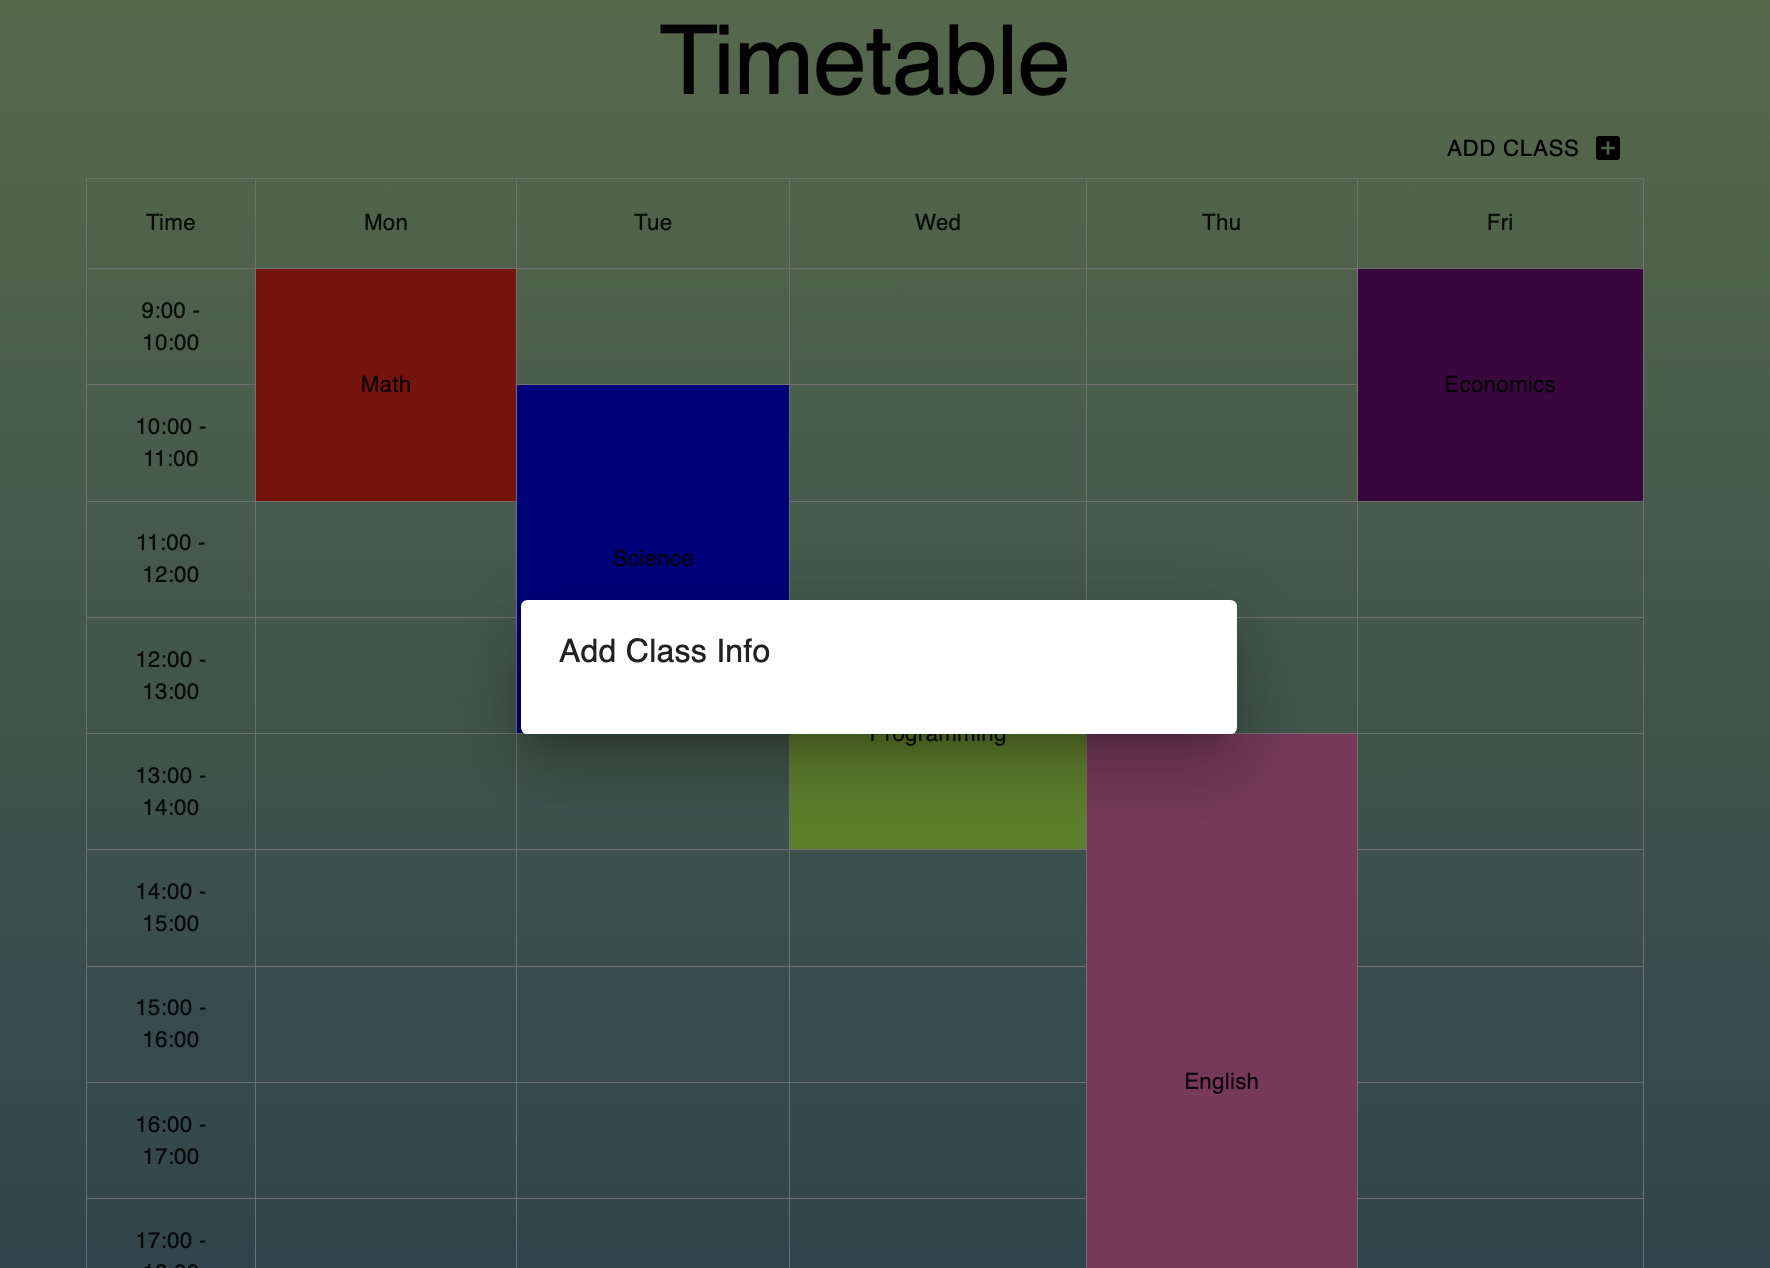
make a button to add classes.
 <TableContainer
        sx={{
          width: "80%",
          minWidth: "650px",
          marginLeft: "auto",
          marginRight: "auto",
          marginTop: "200px",
        }}
      >
        <Typography variant="h2" fontWeight={10} component="div" align="center">
          <div>Timetable</div>
        </Typography>
        <Button
          variant="contain"
          sx={{ float: "right" }}
          endIcon={<AddBoxIcon />}
          onClick={() => {
            setshowModal(true);
          }}
        >
          Add Class
        </Button>
Used material-ui button to add class and it will show the modal
Used setState to control showing the modal screen and removing
import React from "react";
import { Dialog, DialogContent, DialogTitle } from "@mui/material";

export default function InputModal({showModal}) {
  return (
    <Dialog open={showModal}>
      <DialogTitle>Add Class Info</DialogTitle>
      <DialogContent style={{ width: "400px" }}></DialogContent>
    </Dialog>
  );
}
This is the modal I made separately.
And we need to import this modal to the timetable component.
Dialog is material-ui's API so we can use it through importing and give it props to check the status of modal whether it's open or not.
After checking it works well, we should also put a close function
const [editInfo, seteditInfo] = useState({});
  const handleClose = useCallback(() => {
    setshowModal(false);
    seteditInfo({});
  }, []);

  const Edit = useCallback(
    (day, id) => {
      const { start, end, name, color } = timeTableData[day].find(
        (lectureInfo) => lectureInfo.id === id
      );
      seteditInfo({
        dayData: day,
        startTimeData: start,
        endTimeData: end,
        lectureNameData: name,
        colorData: color,
        idNum: id,
      });
      setshowModal(true);
    },
    [timeTableData]
  );
 <Controller
            control={control}
            name="lectureName"
            rules={{ required: true }}
            render={({ field }) => (
              <TextField
                {...field}
                error={!!errors.lectureName}
                style={{ marginTop: "30px", width: "350px" }}
                autoComplete="off"
                label="class name"
              />
            )}
          />
          {errors.lectureName?.type === "required" && (
            <p style={{ color: "#d32f2f" }}>Please Write the name of class</p>
          )}
        </DialogContent>
        <DialogActions>
          <Button>Cancel</Button>
          <Button type="submit">Save</Button>
        </DialogActions>
In this code, !!errors.lectureName is a Boolean expression that checks if the errors.lectureName is truthy or falsy.
The errors object is likely a form validation error object generated by a library such as react-hook-form or Formik. If the lectureName field fails validation, it will have a truthy value, indicating that an error has occurred. The double negation !! is used to convert any truthy value to true, and any falsy value to false.
So, !!errors.lectureName will evaluate to true if there is an error on the lectureName field, and false if there is no error. This value is then passed to the error prop of the TextField component, which determines whether or not to display an error message below the input field.
Controller from React-hook-form?
In React, a controller is a component used to integrate a form input with a state management library such as react-hook-form.
react-hook-form provides a Controller component that makes it easier to integrate controlled inputs with its state management system. The Controller component allows you to wrap your input component and pass down the necessary props and methods from the react-hook-form library.
Using the Controller component, you can define the name of the input, specify the input rules for validation, and define the defaultValue for the input. The Controller component will then take care of registering and managing the input state for you.
Here's an example of using the Controller component with a TextInput component:
import { useForm, Controller } from 'react-hook-form';
import { TextInput } from 'react-native';

function MyForm() {
  const { control, handleSubmit } = useForm();

  const onSubmit = data => console.log(data);

  return (
    <form onSubmit={handleSubmit(onSubmit)}>
      <Controller
        control={control}
        name="firstName"
        rules={{ required: true }}
        defaultValue=""
        render={({ field: { onChange, value } }) => (
          <TextInput
            onChangeText={onChange}
            value={value}
          />
        )}
      />
      <input type="submit" />
    </form>
  );
}
In this example, the Controller component is used to integrate a TextInput component with react-hook-form. The name of the input is set to "firstName", the rules object specifies that the input is required, and the defaultValue is set to an empty string. The render prop function is used to render the TextInput component, passing down the onChange and value props from react-hook-form. When the form is submitted, the onSubmit function will be called with the form data.
lecture color pick option
<div style={{ marginTop: "30px" }}>
            <label htmlFor="lectureColor">시간표 색상:</label>
            <Controller
              control={control}
              name="lectureColor"
              render={({ field }) => (
                <input
                  {...field}
                  style={{ marginLeft: "30px" }}
                  id="lectureColor"
                  type="color"
                />
              )}
            />
 </div>
Here's how the code works:
- The div element is created with a marginTop style of 30px.
- A label element is created with a htmlFor attribute of "lectureColor". This associates the label with the input element below, so when the label is clicked, the input element will receive focus.
- The Controller component is used to create a controlled input field for selecting a color value. The control prop is passed down, which is a reference to the react-hook-form instance created using the useForm hook.
- The name prop is set to "lectureColor", which is the name of the field in the form data object that this input value will be associated with.
- The render prop is used to render the input element. The field prop is passed down as an object that contains several properties and methods, such as onChange, onBlur, value, name, and others. These props and methods are used to control the behavior of the input field.
- The input element is created with an id attribute of "lectureColor" that matches the htmlFor attribute of the label element. This ensures that clicking on the label will focus the input field.
- The type attribute is set to "color", which creates a color picker input field that allows the user to select a color value.
- The spread operator ...field is used to spread all the props and methods passed down from the Controller component onto the input element, so that the input field becomes a controlled component.
- Finally, a style prop is added to the input element with a marginLeft value of 30px, which adds some space between the label and the input field.
const checkOverLap = (A, B) =>
  B.start < A.start ? B.end > A.start : B.start < A.end;
const [timeTableData, settimeTableData] = useRecoilState(timeTableState);
  const Submit = useCallback(
    ({ lectureName, day, startTime, endTime, lectureColor }) => {
      let valid = true;
      for (let index = 0; index < timeTableData[day].length; index++) {
        if (
          checkOverLap(timeTableData[day][index], {
            start: startTime,
            end: endTime,
          })
        ) {
          valid = false;
          break;
        }
      }

      if (!valid) {
        alert("Class already exists at that time.");
        return;
      }
This code defines a function called checkOverLap which takes two arguments, A and B, each of which is an object with start and end properties representing a time range. The function returns a boolean indicating whether or not there is an overlap between the two time ranges.
The Submit function uses the useCallback and useRecoilState hooks from the recoil library. It takes five arguments representing the name, day, start time, end time, and color of a new lecture to be added to a timetable. The function then checks whether there is already a lecture at the specified time and day by iterating through the array of lectures for that day in the timeTableData state.
For each lecture in the array, the checkOverLap function is called with two arguments: the current lecture's start and end times, and an object representing the new lecture's start and end times. If there is an overlap between the two time ranges, the valid flag is set to false and the loop is exited. If valid remains true after iterating through all the lectures for that day, the new lecture is added to the timeTableData state using the settimeTableData function.
If valid is false, an alert is displayed to the user indicating that a class already exists at that time, and the function returns without adding the new lecture to the timetable.
useCallback
useCallback is a React hook that is used to optimize the performance of React applications by memoizing functions.
In React, every time a component re-renders, all of its functions and methods are recreated, even if they are passed down as props to child components. This can lead to unnecessary re-renders and decrease performance.
useCallback allows you to memoize a function and only recreate it when its dependencies change. This means that if the function is used as a prop in a child component, the child component will only re-render if the dependencies of the memoized function change, instead of every time the parent component re-renders.
The useCallback hook takes two arguments: the function to be memoized and an array of dependencies. The array of dependencies is used to determine when the function should be re-created. If any of the dependencies in the array change, the function will be re-created; otherwise, the memoized version of the function will be returned.
Here's an example of how useCallback can be used:
import React, { useCallback, useState } from 'react';

function MyComponent() {
  const [count, setCount] = useState(0);

  const handleClick = useCallback(() => {
    setCount(count + 1);
  }, [count]);

  return (
    <div>
      <p>Count: {count}</p>
      <button onClick={handleClick}>Click me</button>
    </div>
  );
}
In this example, the handleClick function is memoized using useCallback. The dependency array contains count, which means that handleClick will be re-created whenever count changes. This ensures that the handleClick function always has access to the latest value of count.
useRecoilState
useRecoilState is a hook provided by the Recoil library for managing state in React applications. Recoil is a state management library that provides a simple and flexible way to manage state in React applications.
The useRecoilState hook is used to read and write values to an atom, which is a piece of state in Recoil. An atom can hold any type of value, such as numbers, strings, objects, arrays, or even functions.
Here's an example of how to use useRecoilState:
import React from 'react';
import { atom, useRecoilState } from 'recoil';

const counterState = atom({
  key: 'counterState',
  default: 0,
});

function Counter() {
  const [count, setCount] = useRecoilState(counterState);

  const handleClick = () => {
    setCount(count + 1);
  };

  return (
    <div>
      <p>Count: {count}</p>
      <button onClick={handleClick}>Increment</button>
    </div>
  );
}

export default Counter;
In this example, an atom called counterState is created using the atom function provided by Recoil. The useRecoilState hook is used to get the current value of counterState and a function to update it. The current value of counterState is stored in the count variable and the setCount function is used to update it. The handleClick function uses setCount to increment the count when the button is clicked.
useRecoilState automatically subscribes to changes in the atom and re-renders the component when the value of the atom changes. This allows you to easily manage complex state in your React application using a simple and intuitive API.
useState vs useRecoilState
useState and useRecoilState are both hooks used for managing state in React applications, but they differ in their implementation and use cases.
useState is a built-in hook in React that allows you to manage state within a component. It takes an initial value as a parameter and returns a tuple of two values: the current state value and a function to update the state. useState is useful for managing local state within a component, such as user input or UI state.
On the other hand, useRecoilState is a hook provided by the Recoil library, which is a state management library for React. It allows you to manage state across multiple components using atoms and selectors. An atom is a unit of state in Recoil that can be read and updated from any component, while a selector is a function that derives a value from one or more atoms.
In useRecoilState, you pass an atom as an argument and it returns a tuple of two values: the current state value and a function to update the state. useRecoilState is useful for managing global state or state that needs to be shared between multiple components.
One of the main differences between useState and useRecoilState is that useState is limited to managing state within a single component, while useRecoilState allows you to manage state across multiple components. Additionally, useRecoilState provides more flexibility and control over how state is managed and shared between components, while useState is simpler and more lightweight.
Overall, useState and useRecoilState are both useful hooks for managing state in React applications, but they have different use cases and should be used accordingly.
const [timeTableData, settimeTableData] = useRecoilState(timeTableState);

settimeTableData((oldTimeData) => ({
        ...oldTimeData,
        [day]: [...oldTimeData[day], data],
      }));
This code uses the useRecoilState hook from the recoil library to declare a state called timeTableData, which holds an object that represents the timetable data. The state is initialized with an empty object, and the settimeTableData function is used to update the state.
When the settimeTableData function is called, it takes a callback function as an argument. This callback function receives the old state value as a parameter and returns the new state value. In this case, the new state value is an object that is created by spreading the properties of the old state value into a new object and then updating the day property of the new object to include the data object.
The day property is accessed using square brackets because it is a dynamic property name based on the value of the day variable. The spread operator ... is used to create a shallow copy of the old state object so that the original state object is not mutated.
Finally, the settimeTableData function updates the timeTableData state with the new object that was created in the callback function. This causes the React component that is using the timeTableData state to re-render with the updated data.
Sources
[javascript] ?. 옵셔널 체이닝 연산자
자바스크립트에서의 물음표 점 자바스크립트 코드를 보다가 ?. 혹은 ?? 과 같은 문법을 본 적이 있나요? ES11에서 신규 도입된 연산자 입니다! ?. => 옵셔널 체이닝 연산자 개발하다가 object의 property
wizii.tistory.com