Section 05: Rendering Lists & Conditional Content - Working With Really Dynamic Content

The goals
💪🏻Outputting Dynamic Lists Of Content
✌🏻Rendering Content Under Certain Conditions
Array.prototype.map()
The map() method creates a new array populated with the results of calling a provided function on every element in the calling array.
const array1 = [1, 4, 9, 16];

// pass a function to map
const map1 = array1.map(x => x * 2);

console.log(map1);
// expected output: Array [2, 8, 18, 32]
key
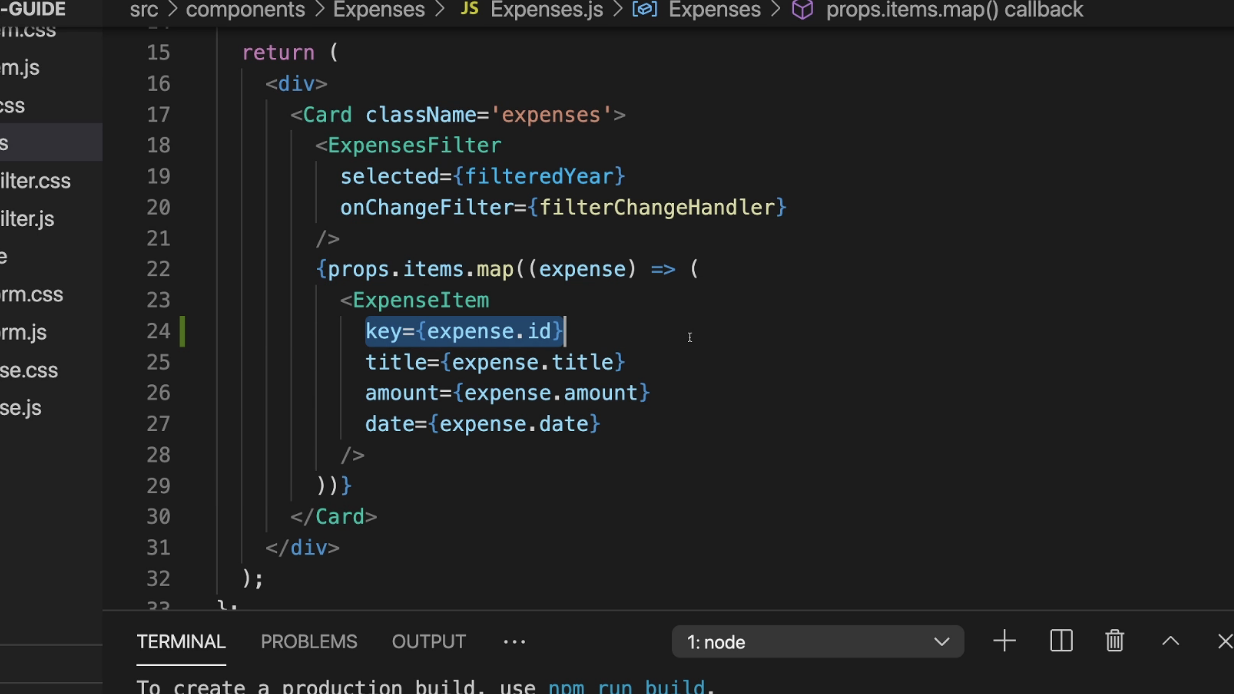
So when we try to control adding some items automatically by React, we can differentiate each item by giving its own id. And we can do it with 'key' property which already exist in html codes. We can bind 'id' to this 'key' and when we do this we naturally assume that we will bring the id from 'database'.
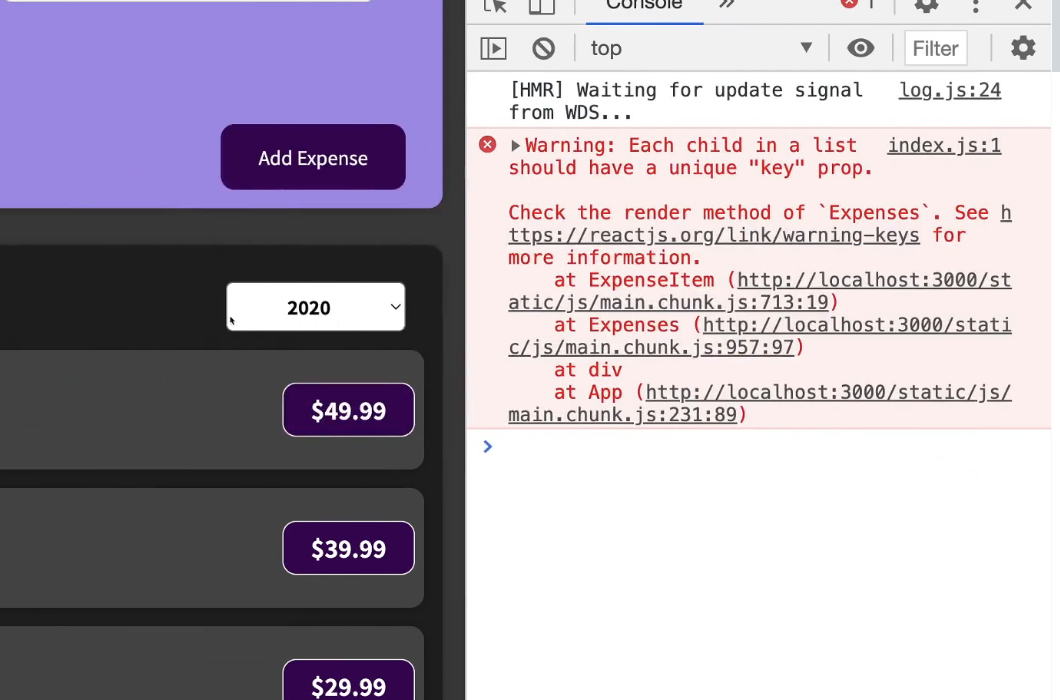
So this error can be fixed!
const DUMMY_EXPENSES = [
  {
    id: 'e1',
    title: 'Toilet Paper',
    amount: 94.12,
    date: new Date(2020, 7, 14),
  },
  {
    id: 'e2',
    title: 'New TV',
    amount: 799.49,
    date: new Date(2021, 2, 12)
  },
  {
    id: 'e3',
    title: 'Car Insurance',
    amount: 294.67,
    date: new Date(2021, 2, 28),
  },
  {
    id: 'e4',
    title: 'New Desk (Wooden)',
    amount: 450,
    date: new Date(2021, 5, 12),
  },
];

const App = () => {
  const [ expenses, setExpenses ] = useState(DUMMY_EXPENSES);

  const addExpenseHandler = expense => {
    setExpenses((prevExpenses) => {
      return [expense, ...prevExpenses];
    });
  };

  return (
    <div>
      <NewExpense onAddExpense={addExpenseHandler} />
      <Expenses items={expenses} />
    </div>
  );
}
기존에 있던 데이터들을 DUMMY_EXPENSES라는 변수에 옮겨서 저장하고 useState를 사용해서 이 값을 기본값으로 사용할 것임을 지정한다. 그리고 addExpenseHandler라는 function을 통해 유저가 추가함에 따라 새로 업데이트 될 expense들을 받아서 setExpenses함수를 통해 기존 데이터 (prevExpenses) 앞에 같이 적어내어 새로운 리스트를 만들어 낸다.
그리고 NewExpense라는 컴포넌트에 onAddExpense라는 이름의 프로퍼티로 addExpenseHandler를 내보내고 Expenses라는 컴포넌트에 items라는 property이름으로 expenses를 첨부하여 보낸다!
const NewExpense = (props) => {
  const saveExpenseDataHandler = (enteredExpenseData) => {
    const expenseData = {
      ...enteredExpenseData,
      id: Math.random().toString()
    };
    props.onAddExpense(expenseData);
  };

  return (
    <div className='new-expense'>
      <ExpenseForm onSaveExpenseData={saveExpenseDataHandler} />
    </div>
  );
};

export default NewExpense;
NewExpense에서는 해당 새로운 아이템 추가된 리스트 업데이트 함수를 활용할 수 있는데 이를 위해서는 props를 받아와줘야 한다.
그리고 새로운 데이터를 저장하는 함수인 saveExpenseDataHandler를 만든다. 이 때는 enteredExpenseData(사용자의 input)를 받아서 expenseData라는 변수에 저장을 하고 동시에 id를 math.random을 활용하여 저장한다. 그리고 아까 만들어서 수출해놓은 새로운 리스트를 만들어내는 onAddExpense에다가 사용자의 input data인 expenseData를 넣어서 새로운 데이터를 반환하게끔 작성한다.
이 때 이 수입해 온 함수를 활용하기 위해서는 props에 그 함수가 들어있음을 명시하면서 사용한다.
그리고 이렇게 작성한 기능을 가진 함수를 역시 return해야 하는데 new-expense라는 class name으로 ExpenseForm이라는 컴포넌트에 onSaveExpenseData라는 이름으로 내보낸다.
이 때 이렇게 수출해낼 때 주로 on이라는 이름을 강사는 붙여서 사용하는 편이다.
Props
props는 properties를 줄인 표현으로 컴포넌트 속성을 설정할 때 사용하는 요소이다. props값은 해당 컴포넌트를 불러와 사용하는 부모 컴포넌트 (현 상황에서는 App컴포넌트가 부모 컴포넌트)에서 설정할 수 있다.
How to set Props!!!
// MyComponent.js

const MyComponent = props => {
  return <div>안녕하세요, 제 이름은 {props.name}입니다.</div>;
};

export default MyComponent;
// App.js
import MyComponent from './MyComponent';
const App = () => {
return <MyComponent name="React" />;
}
export default App;
여기서 name = "React" 을 제거하고 return <MyComponent />;만 출력을 하면
'안녕하세요, 제 이름은 입니다.' 출력
태그 사이에 들어가는 children도 사실 props의 일종이며 그냥 컴포넌트에 전달해주는 값들을 props라고 생각하면 편함!!!
Conditional Operators in JSX Expressions
We can’t write if conditions in JSX expressions, which you might think of as an issue. But React allows us to write conditional operators, like ternary operators as well as the logical short circuit && operator like this:
<p>{a > b ? "Greater" : "Smaller"}</p>
<p>{shouldShow && "Shown"}</p>
Here's a Code Sandbox Demo describing various ways of writing JSX expressions.
-Logical && Operator
-Ternary Operator
Logical AND (&&)
The logical AND (&&) operator (logical conjunction) for a set of boolean operands will be true if and only if all the operands are true. Otherwise it will be false.
More generally, the operator returns the value of the first falsy operand encountered when evaluating from left to right, or the value of the last operand if they are all truthy.
Logical AND (&&) evaluates operands from left to right, returning immediately with the value of the first falsy operand it encounters; if all values are truthy, the value of the last operand is returned.
If a value can be converted to true, the value is so-called truthy. If a value can be converted to false, the value is so-called falsy.
a1 = true && true // t && t returns true
a2 = true && false // t && f returns false
a3 = false && true // f && t returns false
a4 = false && (3 === 4) // f && f returns false
a5 = 'Cat' && 'Dog' // t && t returns "Dog"
a6 = false && 'Cat' // f && t returns false
a7 = 'Cat' && false // t && f returns false
a8 = '' && false // f && f returns ""
a9 = false && '' // f && f returns false
So we used like this
const NewExpense = (props) => {
  const [isEditing, setIsEditing] = useState(false);

  const saveExpenseDataHandler = (enteredExpenseData) => {
    const expenseData = {
      ...enteredExpenseData,
      id: Math.random().toString()
    };
    props.onAddExpense(expenseData);
  };
  const startEditingHandler = () => {
    setIsEditing(true)
  }

  return (
    <div className='new-expense'>
      {!isEditing && <button onClick={startEditingHandler}>Add New Expense</button>}
      {isEditing && <ExpenseForm onSaveExpenseData={saveExpenseDataHandler} />}
    </div>
  );
};
Used logical conditional syntax so check the status of editing and the result would be decided by the latter one.
If isEditing is true, it will check latter one and print it.
If isEditing is false then anyway the result is false.
So in our code, if we are not editing (=true) then we will show this button which works 'startEditingHandler' function when it's clicked.
If we are editing (by clicking the button we made to change the status of 'isEditing') then we will show the form.
*If we set the button type as just "button" then it doens't submit the form.
const stopEditingHandler = () => {
    setIsEditing(false);
  }

  return (
    <div className='new-expense'>
      {!isEditing && <button onClick={startEditingHandler}>Add New Expense</button>}
      {isEditing && <ExpenseForm
      onCancel={stopEditingHandler}
      onSaveExpenseData={saveExpenseDataHandler} />}
    </div>
Not to show this form, we make the function to change the status of 'setIsEditing' which is the second parameter as function to change the isEditing variable's value.
And we send this as props to ExpenseForm.
How to Nest JSX Expressions
You can even do nesting of JSX expressions like this:
const App = () => {
  const number = 10;
  return (
    <div>
      {number > 0 ? (
        <p>Number {number} is positive</p>
      ) : (
        <p>Number {number} is Negative</p>
      )}
    </div>
  );
};
Use JSX syntax to simplfy the codes
let expensesContent = <p>No expenses found.</p>;

  if (filteredExpenses.length > 0) {
    expensesContent = filteredExpenses.map((expense) => (
      <ExpenseItem
        key={expense.id}
        title={expense.title}
        amount={expense.amount}
        date={expense.date}
      />
    ));
  }

  return (
    <div>
      <Card className='expenses'>
        <ExpensesFilter
          selected={filteredYear}
          onChangeFilter={filterChangeHandler}
        />
        {expensesContent}
      </Card>
    </div>
  );
};
해당하는 년도의 아이템만 보여주는 코드를 작성할 때 JSX문법을 잘 활용하면 심플하게 작성할 수 있음'
변수를 만들어서 일단 해당 년도의 아이템이 없는 경우에 나타낼 문구를 저장함
그리고 조건문을 활용해서 있는 경우에는 그 아이템들을 나타낼 것을 명시함
그리고 나중에 return시에 그 변수만 보여주게끔 하면 깔끔하게 코드 작성 가능!
To make Expenses.js file leaner!
We will make another component file to separate the list of expenses.js file so we can make that file much simpler and leaner!
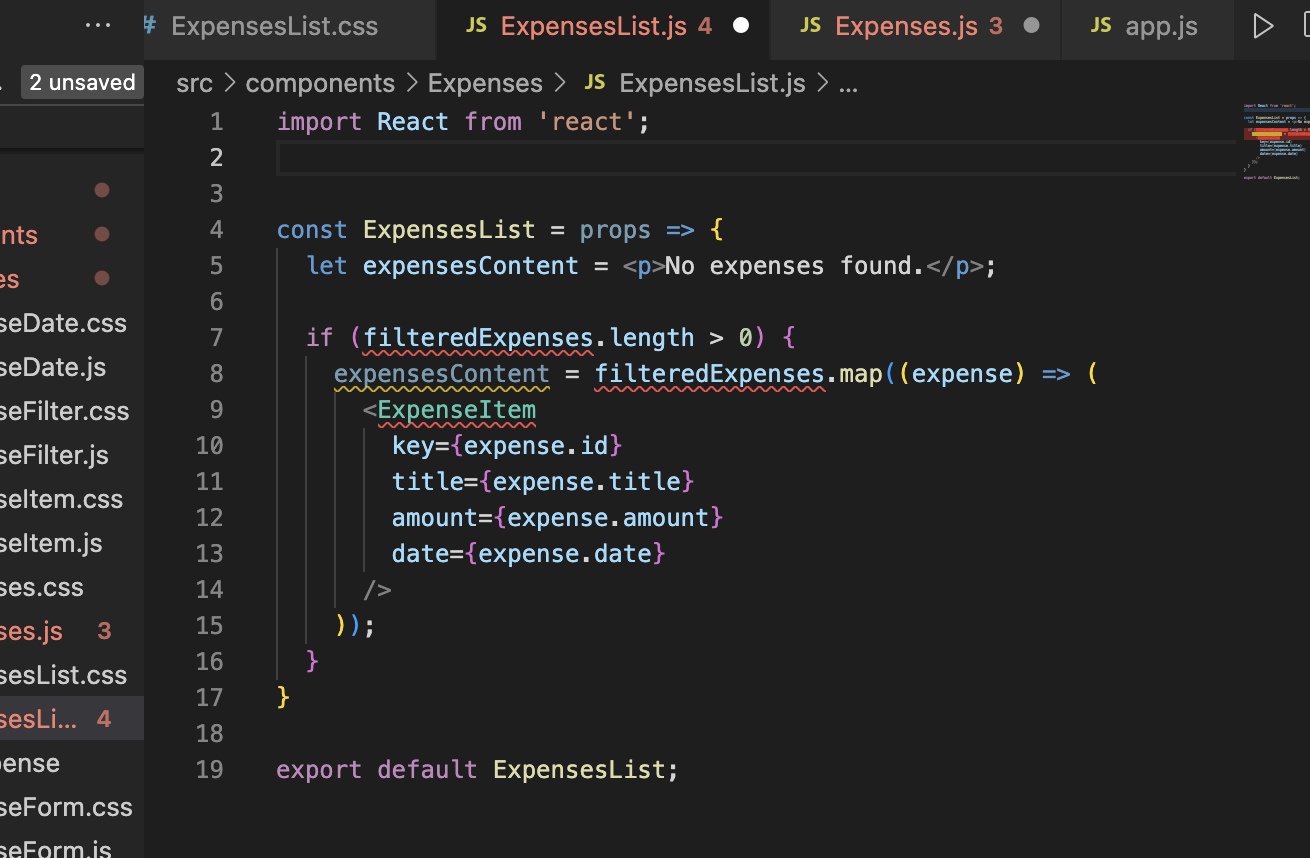
And since we brought ExpenseItem component, we need to import it!
And since we don't have filteredExpense variable, we can borrow it from props (our savings!)
like 'props.items.~' or 'props.expenses.~' anything is fine here!
And go back to the Expenses.js file to fix some parts

Since we moved our expensesContent variable to the other file, we no longer have it here.
But instead, we will organize the list of item as one clear component so we can just use it here.

And now we can send this variable to our new list component!

Like this!!!
And we will give the name as 'items' since we used it before in list component file!!!!!!!
const ExpensesList = (props) => {
if (props.items.length === 0) {
return <h2 className='expenses-list__fallback'>Found no expenses.</h2>;
}
return (
<ul className='expenses-list'>
{props.items.map((expense) => (
<ExpenseItem
key={expense.id}
title={expense.title}
amount={expense.amount}
date={expense.date}
/>
))}
</ul>
);
};
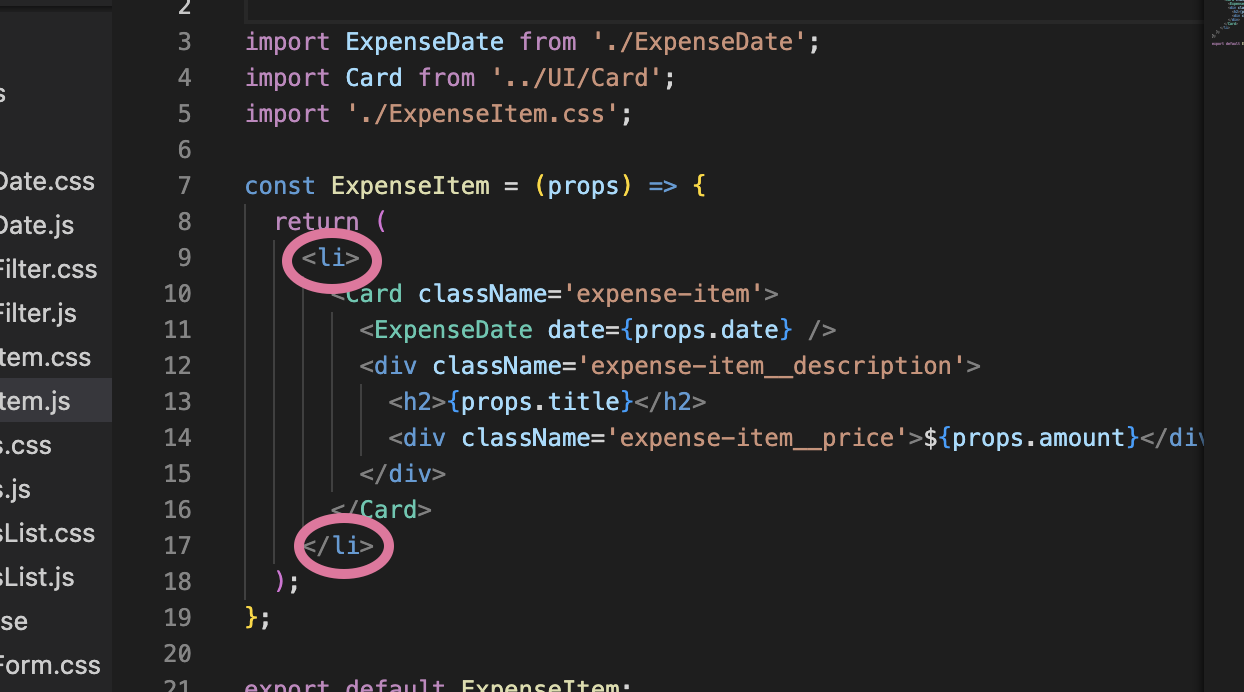
export default ExpensesList;And since we changed it to 'ul' in List component, go to the list item component and change it
Writing code to make chart!
import React from 'react';

import ChartBar from './ChartBar';
import './Chart.css';

// const Chart = (props) => {
//   const dataPointValues = props.dataPoints.map(dataPoint => dataPoint.value);
//   const totalMaximum = Math.max(...dataPointValues);
// this code will be written later not now!

  return (
    <div className='chart'>
      {props.dataPoints.map((dataPoint) => (
        <ChartBar
          key={dataPoint.label}
          value={dataPoint.value}
          maxValue={totalMaximum}
          label={dataPoint.label}
        />
      ))}
    </div>
  );
};

export default Chart;
We write this code first to draw how we will show the chart on our webpage.
And we set that we will get our props as dataPoint, label and value and change the name of it and send it to ChartBar component!
And then go to ExpenseChart.js file to set each label and value!
import React from 'react';

import Chart from '../Chart/Chart';

const ExpensesChart = (props) => {
  const chartDataPoints = [
    { label: 'Jan', value: 0 },
    { label: 'Feb', value: 0 },
    { label: 'Mar', value: 0 },
    { label: 'Apr', value: 0 },
    { label: 'May', value: 0 },
    { label: 'Jun', value: 0 },
    { label: 'Jul', value: 0 },
    { label: 'Aug', value: 0 },
    { label: 'Sep', value: 0 },
    { label: 'Oct', value: 0 },
    { label: 'Nov', value: 0 },
    { label: 'Dec', value: 0 },
  ];

  for (const expense of props.expenses) {
    const expenseMonth = expense.date.getMonth(); // starting at 0 => January => 0
    chartDataPoints[expenseMonth].value += expense.amount;
  }

  return <Chart dataPoints={chartDataPoints} />;
};

export default ExpensesChart;
Used for loop to get through all the expense from expense array and get the expenseMonth value from getMonth
and use it to get the value of each month and put that value to return
Now go back to the Chart.js file to calculate maximum value!
const Chart = (props) => {
  const dataPointValues = props.dataPoints.map(dataPoint => dataPoint.value);
  const totalMaximum = Math.max(...dataPointValues);
  // now we will use this code
  // get all the number value from dataPoint and use spread operator to spread array as each value
  // so now we have 12 args

  return (
    <div className='chart'>
      {props.dataPoints.map((dataPoint) => (
        <ChartBar
          key={dataPoint.label}
          value={dataPoint.value}
          maxValue={totalMaximum}
          label={dataPoint.label}
        />
      ))}
    </div>
  );
};
And now to show this chart on our webpage go to Expenses.js file and in retrun section we put ExpensesChart component and give props as expenses (we used as expenses in other components we already made) with filteredExpenses!
return (
    <div>
      <Card className='expenses'>
        <ExpensesFilter
          selected={filteredYear}
          onChangeFilter={filterChangeHandler}
        />
        <ExpensesChart expenses={filteredExpenses} />
        <ExpensesList items={filteredExpenses}/>
      </Card>
    </div>
  );
+ⓐ
const submitHandler = (event) => {
    event.preventDefault();

    const expenseData = {
      title: enteredTitle,
      amount: +enteredAmount,
      date: new Date(enteredDate),
    };
amount 부분에서 +를 붙여 데이터 타입을 number로 바꿔줘야 함!!!
Sources
https://developer.mozilla.org/en-US/docs/Web/JavaScript/Reference/Global_Objects/Array/map
Array.prototype.map() - JavaScript | MDN
The map() method creates a new array populated with the results of calling a provided function on every element in the calling array.
developer.mozilla.org
https://www.freecodecamp.org/news/jsx-in-react-introduction/
JSX in React – Explained with Examples
JSX is one of the core concepts of React. So if you understand it well, you'll be able to write better React code. In this article, we'll explore: * What is JSX in React and how to use it * How JSX is transformed to React.createElement *
www.freecodecamp.org