
Section 19: NodeJS & HTML Files - Working with Templates : Working With Static & Dynamic Files

The goals
💪🏻Sending HTML Files as Responses
✌🏻Serving Static Files
👍🏻Working With Dynamic Templates
A project we are gonna build through this section
res.send vs res.sendFile
You can't use both res.send() and res.sendFile() in the same route and method because every request has only one response and each one is called first, that's your response.
You're trying to pass a filename to render, but it does not take a filename, it takes the name of a view (and it also requires a callback be supplied as well.) Use sendfile if you want to send the contents of a file as the response.
path.join(__dirname)
to get the absolute path to this project folder
below is how we used in our project
app.get('/restaurants', function(req, res) {
  const htmlFilePath = path.join(__dirname, 'views', 'restaurants.html');
  res.sendFile(htmlFilePath)
});
To get the absolute path to get this folder
__dirname
__dirname is an environment variable that tells you the absolute path of the directory containing the currently executing file.
Making New Directories
To create a new directory in your index.js file, insert __dirname as the first argument to path.join() and the name of the new directory as the second:
const fs = require('fs');
const path = require('path');
const dirPath = path.join(__dirname, '/pictures');

fs.mkdirSync(dirPath);
Now you’ve created a new directory, pictures, after calling on the mdirSync() method, which contains __dirname as the absolute path.
Pointing to Directories
Another unique feature is its ability to point to directories. In your index.js file, declare a variable and pass in the value of __dirname as the first argument in path.join(), and your directory containing static files as the second:
express.static(path.join(__dirname, '/public'));
Here, you’re telling Node.js to use __dirname to point to the public directory that contains static files.
Adding Files to a Directory
You may also add files to an existing directory. In your index.js file, declare a variable and include __dirname as the first argument and the file you want to add as the second:
const fs = require('fs');
const path = require('path');
const filePath = path.join(__dirname, '/pictures');

fs.openSync(filePath, 'hello.jpeg');
Using the openSync() method will add the file if it does not exist within your directory.
what's the difference of putting '/' in <a>tag code?
Anchor Tag
We can reference other files with the anchor tag. We use this tag and its href attribute to create a hyperlink.
Syntax:
<a href="http://www.plantplaces.com/faq.shtml">View the PlantPlaces FAQ</a>Note that I used an absolute URL, since the PlantPlaces FAQ is on an external site. On the other hand, if I want to make a link within this site, I can do it like this:
<a href="cssintro.shtml">Introduction to CSS</a>
creates this link, which links to a file in the same directory as the page you are currently viewing
When I added the PlantPlaces FAQ, I added this link to the side navigation:
<a href="/faq.shtml">Green FAQ</a>If we use with slash(/), it means that it will always be appended directly after the domain
If we use without slash(/), it we were looking at main.html then it will be appended after domain/main/faq
We can also have links within a page. For this, we use the name attribute to create an anchor, or an area where we want the link to take us:
<a name="alternativeenergy"></a>
This tag will not have a physical presence on the screen that the user sees. But, we can link to this tag with this syntax:
<a href="#alternativeenergy">Alternative Energy</a>
This makes it easy to replicate a table of contents, similar to what you might see in a word processing program. This is very useful when you have a long document with a lot of text, like our FAQ. We'll use anchors in our FAQ.
Express.static()
The express.static() function is a built-in middleware function in Express. It serves static files and is based on serve-static. Syntax:
express.static(root, [options])Parameters: The root parameter describes the root directory from which to serve static assets.
Return Value: It returns an Object.
how we used
app.use(express.static('public'));so, it means that we will serve static assets from 'public' folder
express.urlencoded({ extended: false })
The express.urlencoded() function is a built-in middleware function in Express. It parses incoming requests with urlencoded payloads and is based on body-parser.
Syntax:
express.urlencoded( [options] )Parameter: The options parameter contains various property like extended, inflate, limit, verify etc.
Return Value: It returns an Object.
e.g.
var express = require('express');
var app = express();
var PORT = 3000;

app.use(express.urlencoded({extended:false}));

app.post('/', function (req, res) {
	console.log(req.body);
	res.end();
});

app.listen(PORT, function(err){
	if (err) console.log(err);
	console.log("Server listening on PORT", PORT);
});
Output:
Server listening on PORT 3000
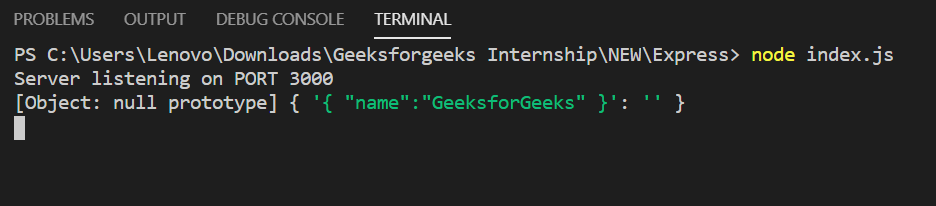
- Now make a POST request to http://localhost:3000/ with header set to ‘content-type: application/x-www-form-urlencoded’ and body {“title”:”GeeksforGeeks”}, then you will see the following output on your console:
body-parser(bp), bp.json() and bp.urlencoded({ extended: true / false })
bp.json() - middleware for parsing json objects - options can be found here. Source code can be found here.
Returns middleware that only parses JSON and only looks at requests where the Content-Type header matches the type option. This parser accepts any Unicode encoding of the body and supports automatic inflation of gzip and deflate encodings.
bp.urlencoded({ extended: true }) - middleware for parsing bodies from URL. Options can be found here. Source code can be found here.
Returns middleware that only parses {urlencoded} bodies and only looks at requests where the Content-Type header matches the type option. This parser accepts only UTF-8 encoding of the body and supports automatic inflation of gzip and deflate encodings.
A new body object containing the parsed data is populated on the request object after the middleware (i.e. req.body). This object will contain key-value pairs, where the value can be a string or array (when extended is false), or any type (when extended is true).
extended
The extended option allows to choose between parsing the URL-encoded data with the querystring library (when false) or the qs library (when true). The "extended" syntax allows for rich objects and arrays to be encoded into the URL-encoded format, allowing for a JSON-like experience with URL-encoded. For more information, please see the qs library. Defaults to true, but using the default has been deprecated. Please research into the difference between qs and querystring and choose the appropriate setting.
querystring vs qs
Query String
The querystring module provides utilities for parsing and formatting URL query strings.
qs module
A querystring parsing and stringifying library with some added security.
qs allows you to create nested objects within your query strings, by surrounding the name of sub-keys with square brackets [].
For example, the string 'foo[bar]=baz' converts to:
assert.deepEqual(qs.parse('foo[bar]=baz'), {
>     foo: {
>         bar: 'baz'
>     } });
Compared to Query String, it is able of parsing nested objects...
By default, when nesting objects qs will only parse up to 5 children deep. This means if you attempt to parse a string like 'a[b][c][d][e][f][g][h][i]=j' your resulting object will be:
var expected = {
    a: {
        b: {
            c: {
                d: {
                    e: {
                        f: {
                            '[g][h][i]': 'j'
                        }
                    }
                }
            }
        }
    }
};
To be simple, querystring cannot parse nested object. Instead, it will be presented in [] format.
While qs can be parsed in nested object.
req.body
The req.body property contains key-value pairs of data submitted in the request body. By default, it is undefined and is populated when you use a middleware called body-parsing such as express.urlencoded() or express.json().
Syntax:
req.bodyParameter: No parameters.
Return Value: Object
e.g.
var express = require('express');
var app = express();
var PORT = 3000;

// For parsing application/json
app.use(express.json());

// For parsing application/x-www-form-urlencoded
app.use(express.urlencoded({ extended: true }));

app.post('/profile', function (req, res) {
console.log(req.body);
res.send();
});

app.listen(PORT, function(err){
	if (err) console.log(err);
	console.log("Server listening on PORT", PORT);
});
Output:
Server listening on PORT 3000
Now make POST request to http://localhost:3000/profile with following body:
 {
     "title":"Greetings from GeeksforGeeks"
 }
Now you can see the following output on your console:
Server listening on PORT 3000 { title: 'Greetings from GeeksforGeeks' }
EJS template engine
EJS: EJS or Embedded Javascript Templating is a templating engine used by Node.js. Template engine helps to create an HTML template with minimal code. Also, it can inject data into HTML template at the client side and produce the final HTML. EJS is a simple templating language which is used to generate HTML markup with plain JavaScript. It also helps to embed JavaScript to HTML pages.
Template engine helps us to create an HTML template with minimal code. Also, it can inject data into HTML template at client side and produce the final HTML.
The following figure illustrates how template engine works in Node.js.
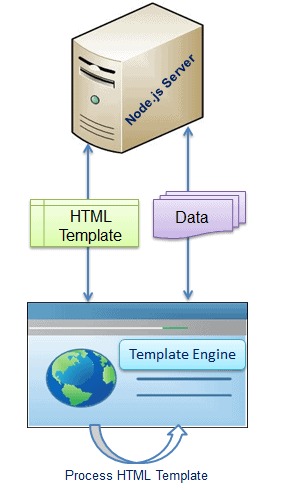
As per the above figure, client-side browser loads HTML template, JSON/XML data and template engine library from the server. Template engine produces the final HTML using template and data in client's browser. However, some HTML templates process data and generate final HTML page at server side also.
There are many template engines available for Node.js. Each template engine uses a different language to define HTML template and inject data into it.
The following is a list of important (but not limited) template engines for Node.js
const express = require('express')
const app = express()
const port = 3000

app.set('view engine', 'ejs')

app.get('/', (req, res) => {
    res.render('pages/index')
})
app.listen(port, () => {
  console.log(`App listening at port ${port}`)
})
And the following into index.ejs:
<h1>Hi, there!</h1>If you run node app.js on the terminal from the root folder, then visit [localhost:3000](http://localhost:3000/), you should see the following results:

Now, let’s walk through some parts of the code and understand what is going on.
app.set('view engine', 'ejs') is self-explanatory. We are setting EJS as the Express app view engine. By default, Express will look inside of a views folder when resolving the template files, which is why we had to create a views folder.
In res.render('pages/index'), we are calling the render method on the response object. This renders the view provided (pages/index in this case) and sends back the rendered HTML string to the client.
Note that we didn’t have to provide the file extension because Express resolves it automatically; it knows the view engine we are using from app.set('view engine', 'ejs'). We also didn’t have to write the path as views/pages/index because the views folder is used by default.
Passing data to render
Recall that our aim is to combine data with templates. We can do that by passing a second argument to res.render. This second argument must be an object, which will be accessible in the EJS template file.
Update app.js like so:
const express = require('express')
const app = express()
const port = 3000
app.set('view engine', 'ejs')

const user = {
    firstName: 'Tim',
    lastName: 'Cook',
}
app.get('/', (req, res) => {
    res.render('pages/index', {
        user: user
    })
})
app.listen(port, () => {
  console.log(`App listening at port ${port}`)
})
Update index.ejs too:
<h1>Hi, I am <%= user.firstName %></h1>Run node app.js and you should get this:

EJS syntax
You have just seen the basic syntax of EJS. The syntax follows as such:
<startingTag content closingTag>This is the syntax of <%= user.firstName %>.
EJS has different tags for different purposes. This start tag <%= is called the “escape output” tag because if the string in the content has forbidden characters like > and &, the characters will be escaped (replaced by HTML codes) in the output string.
So, if it's written with <%= , then it means it will bring some data as raw data. Otherwise some user can use html tag like <h1></h1> to override
Logic in EJS
EJS lives up to its name, because we are provided with the tag <% that can contain logic (called a “scriptlet”) as its content. Any JavaScript syntax can be used in this tag.
To see this in action, update app.js:
const express = require('express')
const app = express()
const port = 3000
app.set('view engine', 'ejs')
const user = {
    firstName: 'Tim',
    lastName: 'Cook',
    admin: true,
}
app.get('/', (req, res) => {
    res.render('pages/index', {
        user
    })
})
app.listen(port, () => {
  console.log(`App listening at port ${port}`)
})
Then update index.js:
<h1>Hi, I am <%= user.firstName  %></h1>
<% if (user.admin) { %>
    <p>Let me tell you a secret: <b>I am an admin</b></p>
<% } %>
If you run the app, you will see the paragraph in the if statement displayed.
Change admin: false in the user object, and the paragraph won’t be displayed.
Take note of the syntax of the scriptlet <%*if*(user.admin) { %>. The opening { is captured between start and close tags, and the closing } in separate start and close tags.
Looping through data
Because the <% tag can contain any valid JavaScript code, we can also loop through and display data in EJS. Create a new file inside the views/pages named articles.ejs.
Next, update app.js:
const express = require('express')
const app = express()
const port = 3000
app.set('view engine', 'ejs')

const posts = [
    {title: 'Title 1', body: 'Body 1' },
    {title: 'Title 2', body: 'Body 2' },
    {title: 'Title 3', body: 'Body 3' },
    {title: 'Title 4', body: 'Body 4' },
]
const user = {
    firstName: 'Tim',
    lastName: 'Cook',
}
app.get('/', (req, res) => {
    res.render('pages/index', {
        user
    })
})
app.get('/articles', (req, res) => {
    res.render('pages/articles', {
        articles: posts
    })
})
app.listen(port, () => {
  console.log(`App listening at port ${port}`)
})
articles.ejs should also be updated like so:
<!DOCTYPE html>
<html lang="en">
<head>
    <meta charset="UTF-8">
    <meta http-equiv="X-UA-Compatible" content="IE=edge">
    <meta name="viewport" content="width=device-width, initial-scale=1.0">
    <title>Articles</title>
</head>
<body>
    <ul>
        <% articles.forEach((article)=> { %>
            <li>
                <h2>
                    <%= article.title %>
                </h2>
                <p>
                    <%= article.body %>
                </p>
            </li>
            <hr />
        <% }) %>
    </ul>
</body>
</html>
When you run the app, visit http://localhost:3000/articles and you should see the following:
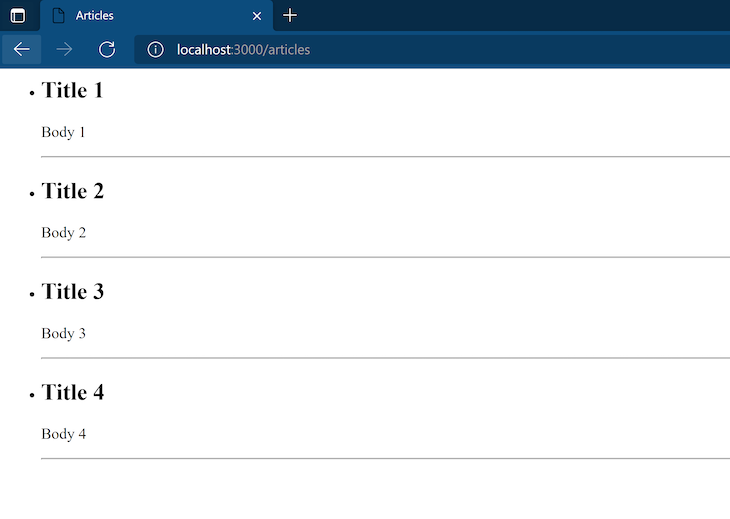
We passed articles which is an array of post objects containing a title and a body to the articles.ejs template. Then, in the template, we loop through the array using forEach to render each post object as a list item.
Notice that the article variable that references each item of the array on each iteration of the loop <% articles.forEach((article)=> { %> is accessible in other portions of the template code until we reach the end of the closing brackets <% }) %>.
If we use template then we can also use
res.render();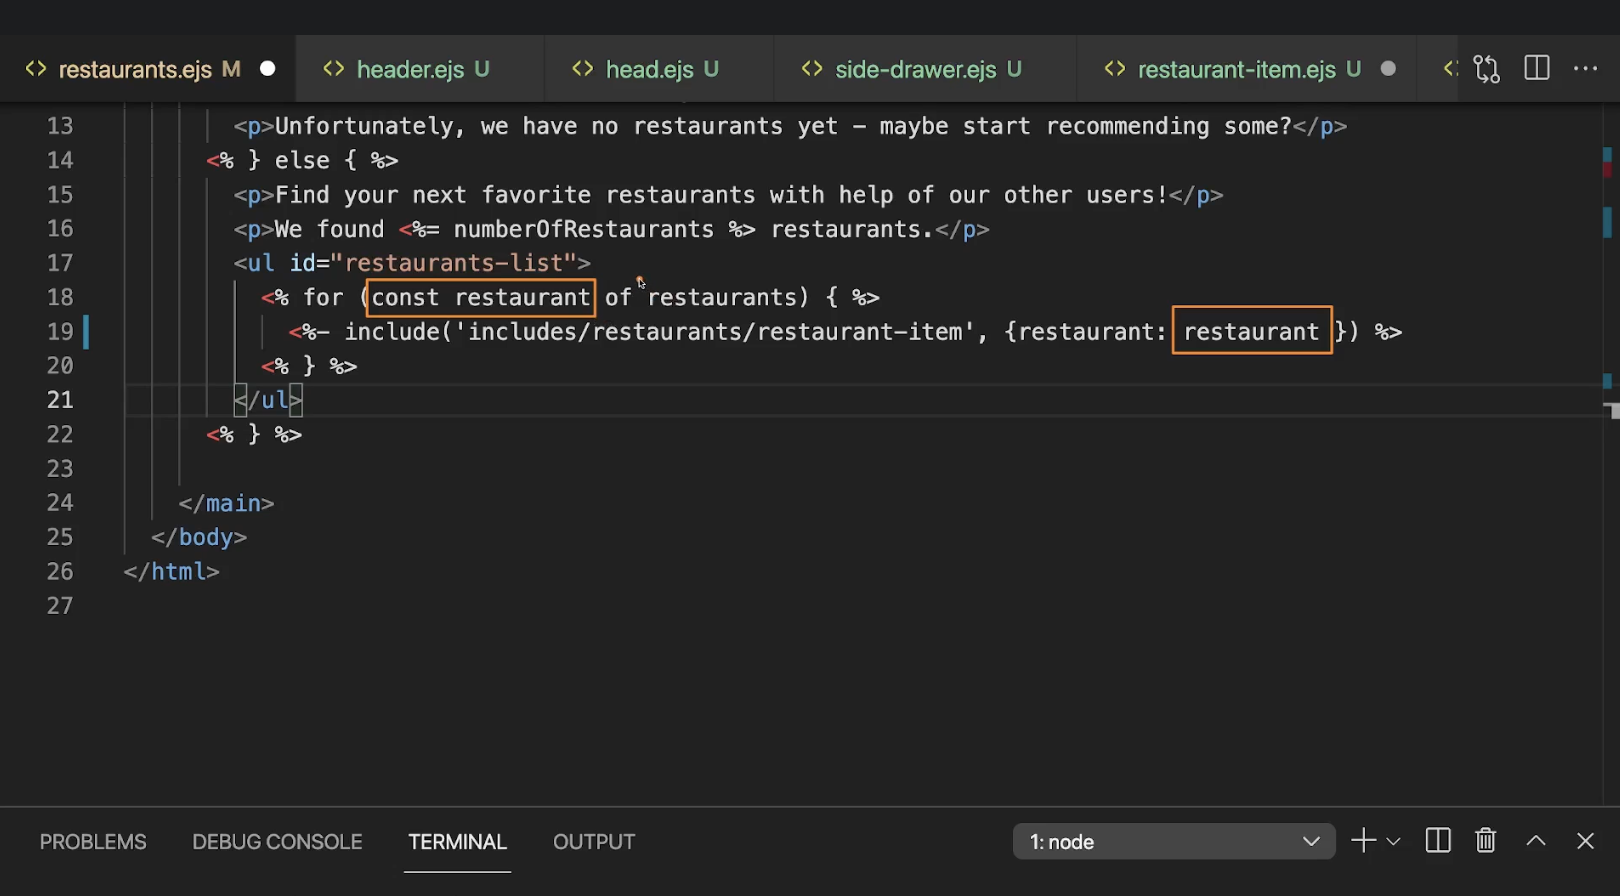
and the other restaurant which is right next to the orange boxed restaurant is a key from

Tags
- <% 'Scriptlet' tag, for control-flow, no output
- <%_ ‘Whitespace Slurping’ Scriptlet tag, strips all whitespace before it
- <%= Outputs the value into the template (HTML escaped)
- <%- Outputs the unescaped value into the template
- <%# Comment tag, no execution, no output
- <%% Outputs a literal '<%'
- %> Plain ending tag
- -%> Trim-mode ('newline slurp') tag, trims following newline
- _%> ‘Whitespace Slurping’ ending tag, removes all whitespace after it
Includes
Includes are relative to the template with the include call. (This requires the 'filename' option.) For example if you have "./views/users.ejs" and "./views/user/show.ejs" you would use <%- include('user/show'); %>.
You'll likely want to use the raw output tag (<%-) with your include to avoid double-escaping the HTML output.
<ul>
  <% users.forEach(function(user){ %>
    <%- include('user/show', {user: user}); %>
  <% }); %>
</ul>
<%- ABCD~%>
we use this ejs syntax whenever we wanna render html file
<%- include() %>
res.render()
The function used to render an HTML view and to send the rendered HTML data to the client is known as the res.render() function.
In Express, this function has two parameters in it, that are,
- Locals: It is an object whose properties would define the view.
- Callback: A callback function as an optional parameter. If this callback function is provided, then this function returns both, the possible error and the rendered string. This function does not perform an automated response. When an error occurs while execution, the function calls next(err) internally.
The syntax of the res.render() function looks like:
res.render(view [, locals] [, callback])
res.json vs res.send vs res.end
Response
Whenever an Express application server receives an HTTP request, it will provide the developer with an object, commonly referred to as res. Here's a really simple example:
app.get('/api/test', (req, res) => {
  // ... do something ...
});
The res object is an enhanced version of the response object found in Node.js.
Sending a response
There are multiple ways to send responses using Express, and we’ll go through a few examples now.
1. res.send()
Sending a response can be achieved by calling the res.send() method.
The signature of this method looks like this: res.send([body]) where the body can be any of the following: Buffer, String, an Object and an Array.
This method automatically sets the Content-Type response header as well based on the argument passed to the send() method, so for example if the [body] is a Bufferthe Content-Type will be set toapplication/octet-stream unless of course we programmatically set it to be something else.
Programmatically setting the Content-Type header is possible via the set() method on the res object:
res.set('Content-Type', 'text/html');.
Many developers out there are using Express to create RESTful APIs, and most of the time such APIs return JSON data. Now the question is of course, should we use res.send() to return JSON data - since this method accepts objects as part of its argument - or should we use res.json()?
Let’s see what happens when we try to send JSON data:
app.get('/api/test', (req, res) => {
  res.send({ hello: 'world' });
});
The response header looks like this:
X-Powered-By: Express
Content-Type: application/json; charset=utf-8
Content-Length: 17
ETag: W/"11-IkjuL6CqqtmReFMfkkvwC0sKj04"
Date: Fri, 10 Aug 2018 09:34:13 GMT
Connection: keep-alive
We can see that Express has correctly set the ‘Content-Type’. So if this works, why would Express expose res.json() at all?
2. res.json()
It sends a JSON response. This method is identical to res.send() when an object or array is passed, but it also converts non-objects to json.
Namely, it can format the returned JSON data by applying two options:
app.set('json replacer', replacer); // property transformation rules
app.set('json spaces', 2); // number of spaces for indentation
These two options are collected and passed to the JSON.stringify() method: since its signature loos like this: JSON.stringify(object, replacer, space ). Once this method is called, the res.json() method will then call res.send() as well under the hood.
There is no actual difference between res.send and res.json, both methods are almost identical. res.json calls res.send at the end. When you have an object or array which you have to pass as a response then you can use any one of them.
But the main difference between res.json and res.send comes into picture when you have to pass non objects as a response. res.json will convert non objects (ex. null, undefined etc) as well which are actually not a valid JSON whereas res.send will not convert them.
res.json also uses json replacer and json spaces application settings.
json replacer : It is a setting which is passed to JSON.stringify() for allowing you to manipulate and filter the JSON response.
json spaces : Its is a setting which enables the developer to decide if res.json() responds with nicely formatte JSON or compact JSON.
Last but not least let’s take a look at res.end(). Do we need to call it?
Take a look at this article and see what happens when you don’t call res.end(): Concurrent HTTP connections in Node.js
3. res.end()
This method kind of makes sense, right? There’s a response and once we have collected the data or did something else we want to present that to the caller and as a last step we should end the session — this could be achieved by calling res.end(). But do we need it? The answer is two-fold: yes and no.
We can use res.end() if we want to end the response without providing any data. This could be useful for a 404 page, for example:
res.status(404).end();In the code above we are explicitly setting the HTTP status code and immediately after that ending the response.
But what if we want to send some data and end the response? The answer is simple, res.send() (and remember, res.json()) both allow us to send some data and they also end the response, so there's no need to explicitly call res.end().
Please also note that res.end() does not send an ETag header for the HTTP response whereas res.send() does. This Entity Tag header is important when working with web cache validation - it helps caches to be more efficient as well as saves bandwidth.
app.set()
after declaring
const app = express();app.set() is a method that allows us to set certain options for this express app
The app.set() function is used to assigns the setting name to value. You may store any value that you want, but certain names can be used to configure the behavior of the server.
Syntax:
app.set(name, value)e.g.
var express = require('express');
var app = express();
var PORT = 3000;

app.set('title', 'GeeksforGeeks');

app.get('/', (req, res) => {
res.send(app.get('title'));
})

app.listen(PORT, function(err){
	if (err) console.log(err);
	console.log("Server listening on PORT", PORT);
});
Output:
Server listening on PORT 3000
Now open the browser and go to http://localhost:3000/, you will get the following output:
GeeksforGeeksSo this is how you can use the express app.set() function which assigns setting name to value.
JavaScript tips
1. Even if we make a json file and write some data in json format still it's just an array not real json file. So we need to use that data to make it as JSON format, we use 'JSON.parse('')'
Sources
https://www.geeksforgeeks.org/express-js-express-static-function/
Express.js express.static() Function - GeeksforGeeks
A Computer Science portal for geeks. It contains well written, well thought and well explained computer science and programming articles, quizzes and practice/competitive programming/company interview Questions.
www.geeksforgeeks.org
https://www.geeksforgeeks.org/express-js-express-urlencoded-function/?ref=lbp
Express.js express.urlencoded() Function - GeeksforGeeks
A Computer Science portal for geeks. It contains well written, well thought and well explained computer science and programming articles, quizzes and practice/competitive programming/company interview Questions.
www.geeksforgeeks.org
https://github.com/expressjs/body-parser#bodyparserurlencodedoptions
GitHub - expressjs/body-parser: Node.js body parsing middleware
Node.js body parsing middleware. Contribute to expressjs/body-parser development by creating an account on GitHub.
github.com
What is the meaning of "bodyParser.urlencoded({ extended: true }))" and "bodyParser.json()" in Express.js?
const bp = require("body-parser"); const express = require("express"); const app = express(); app.use(bp.json()); app.use(bp.urlencoded({ extended: true })); I need to know what
stackoverflow.com
EJS -- Embedded JavaScript templates
Simple syntax JavaScript code in simple, straightforward scriptlet tags. Just write JavaScript that emits the HTML you want, and get the job done!
ejs.co
https://www.tutorialsteacher.com/nodejs/template-engines-for-nodejs
Template Engines for Node.js
Template Engines for Node.js Template engine helps us to create an HTML template with minimal code. Also, it can inject data into HTML template at client side and produce the final HTML. The following figure illustrates how template engine works in Node.js
www.tutorialsteacher.com
https://www.geeksforgeeks.org/express-js-app-set-function/
Express.js | app.set() Function - GeeksforGeeks
A Computer Science portal for geeks. It contains well written, well thought and well explained computer science and programming articles, quizzes and practice/competitive programming/company interview Questions.
www.geeksforgeeks.org